In this example, we’ll set up our pricing model as follows, which requires no upfront commitment:
-
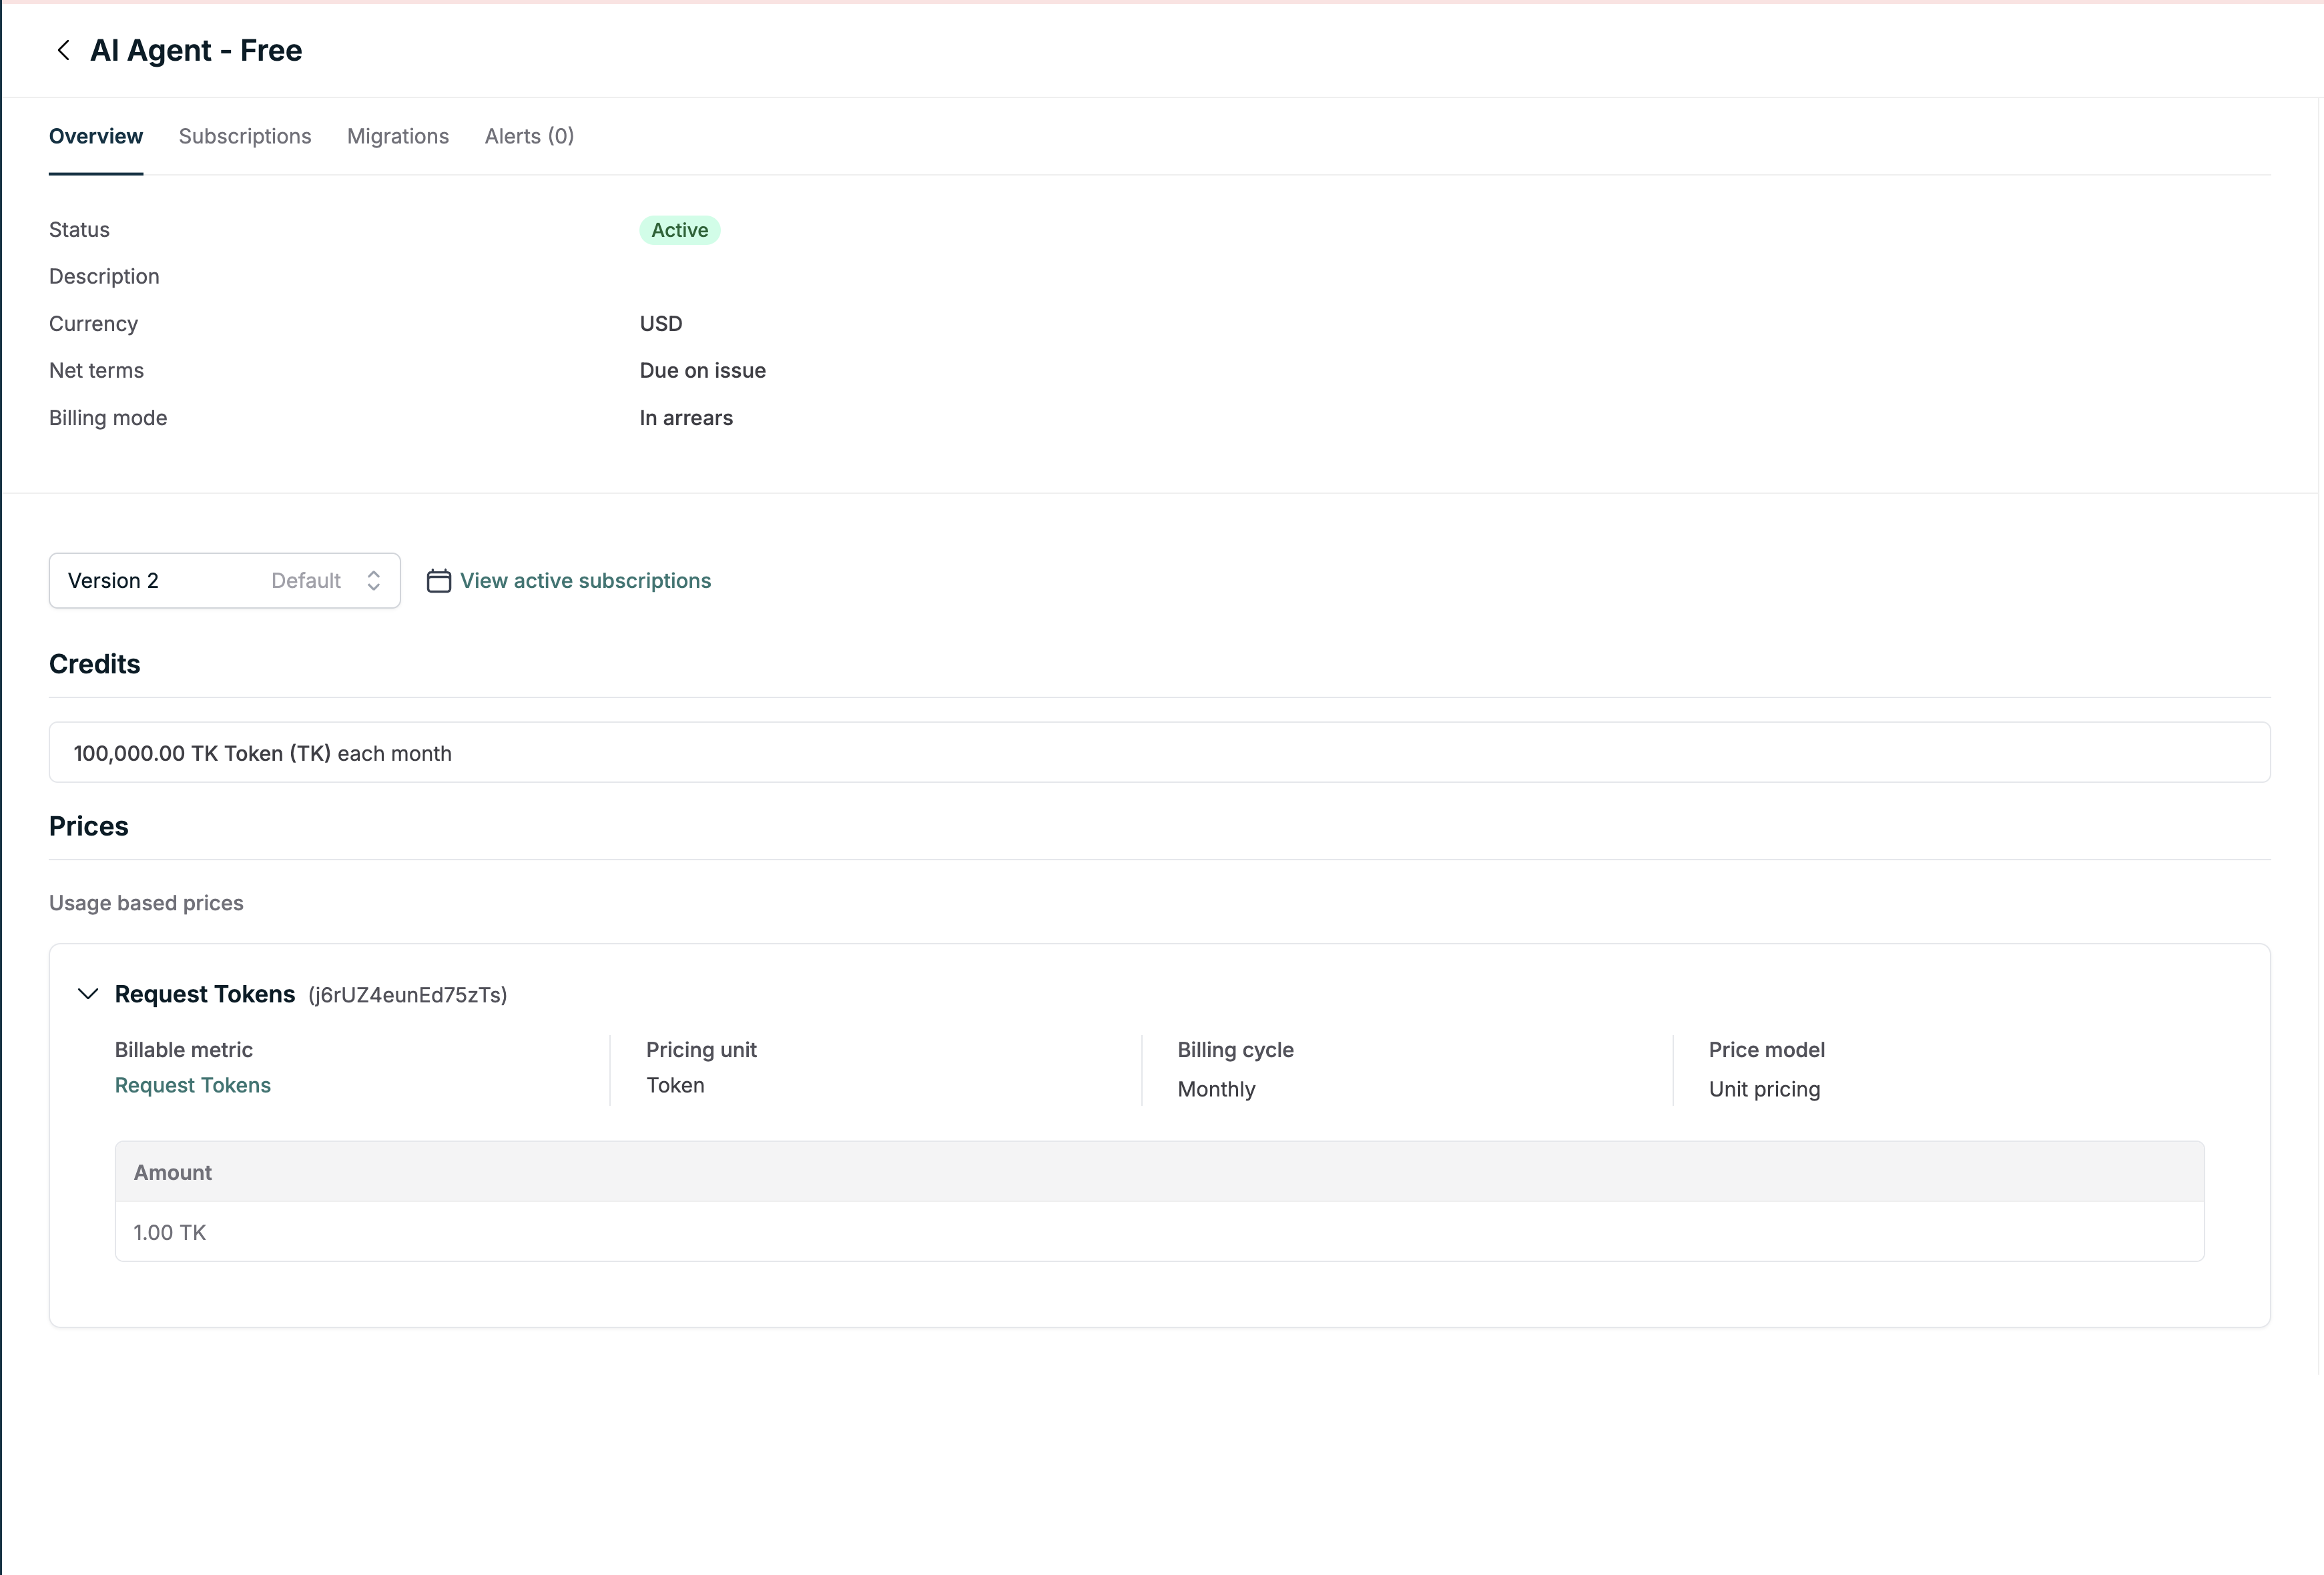
Each month, your customer receives 100K free tokens. As your customer uses your AI agent, they will consume these tokens in real-time.
-
Customers must have available tokens in order for the agent to make progress.
-
Customers can either buy tokens on-demand, or set up an automatic top-up to buy tokens on their behalf when they’re depleted.
-
The cost of on-demand tokens is $10 per 100K tokens.
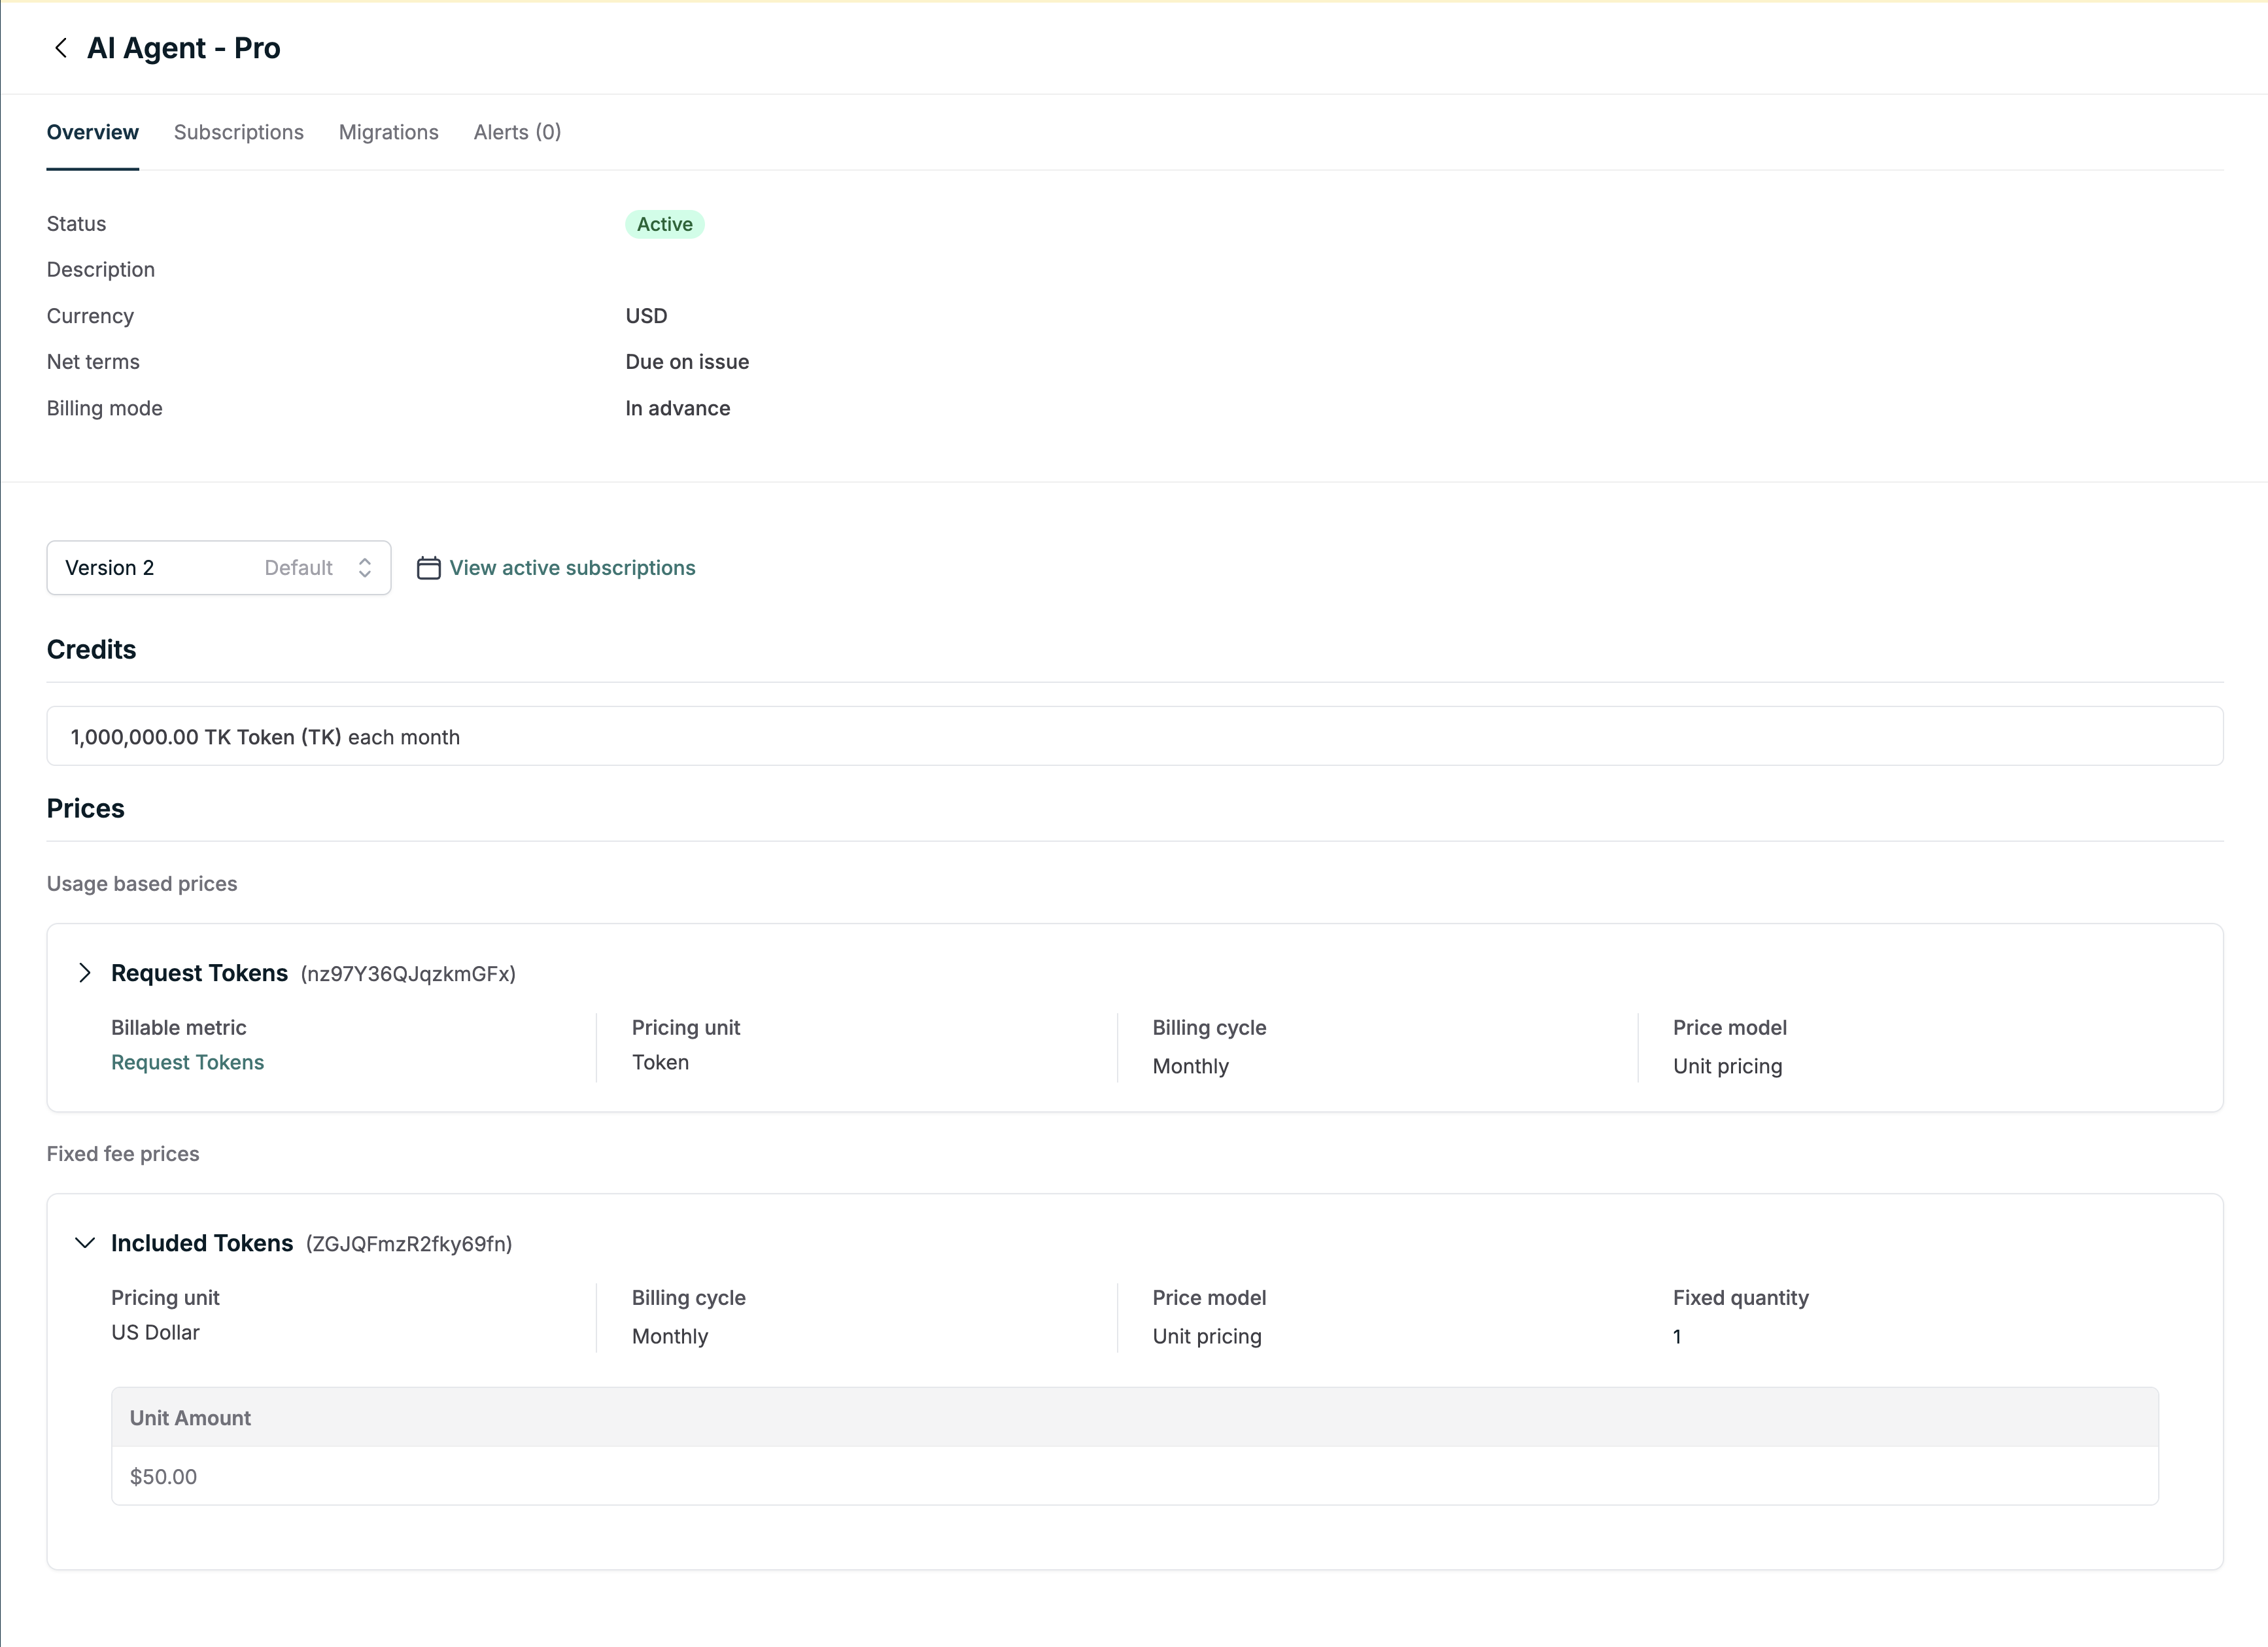
We’ll also set up a higher tier plan (“Premium”) that costs $50/mo upfront, and grants 1M tokens per month. More tokens can still be bought at the same on-demand token price of $10 per 100K tokens.
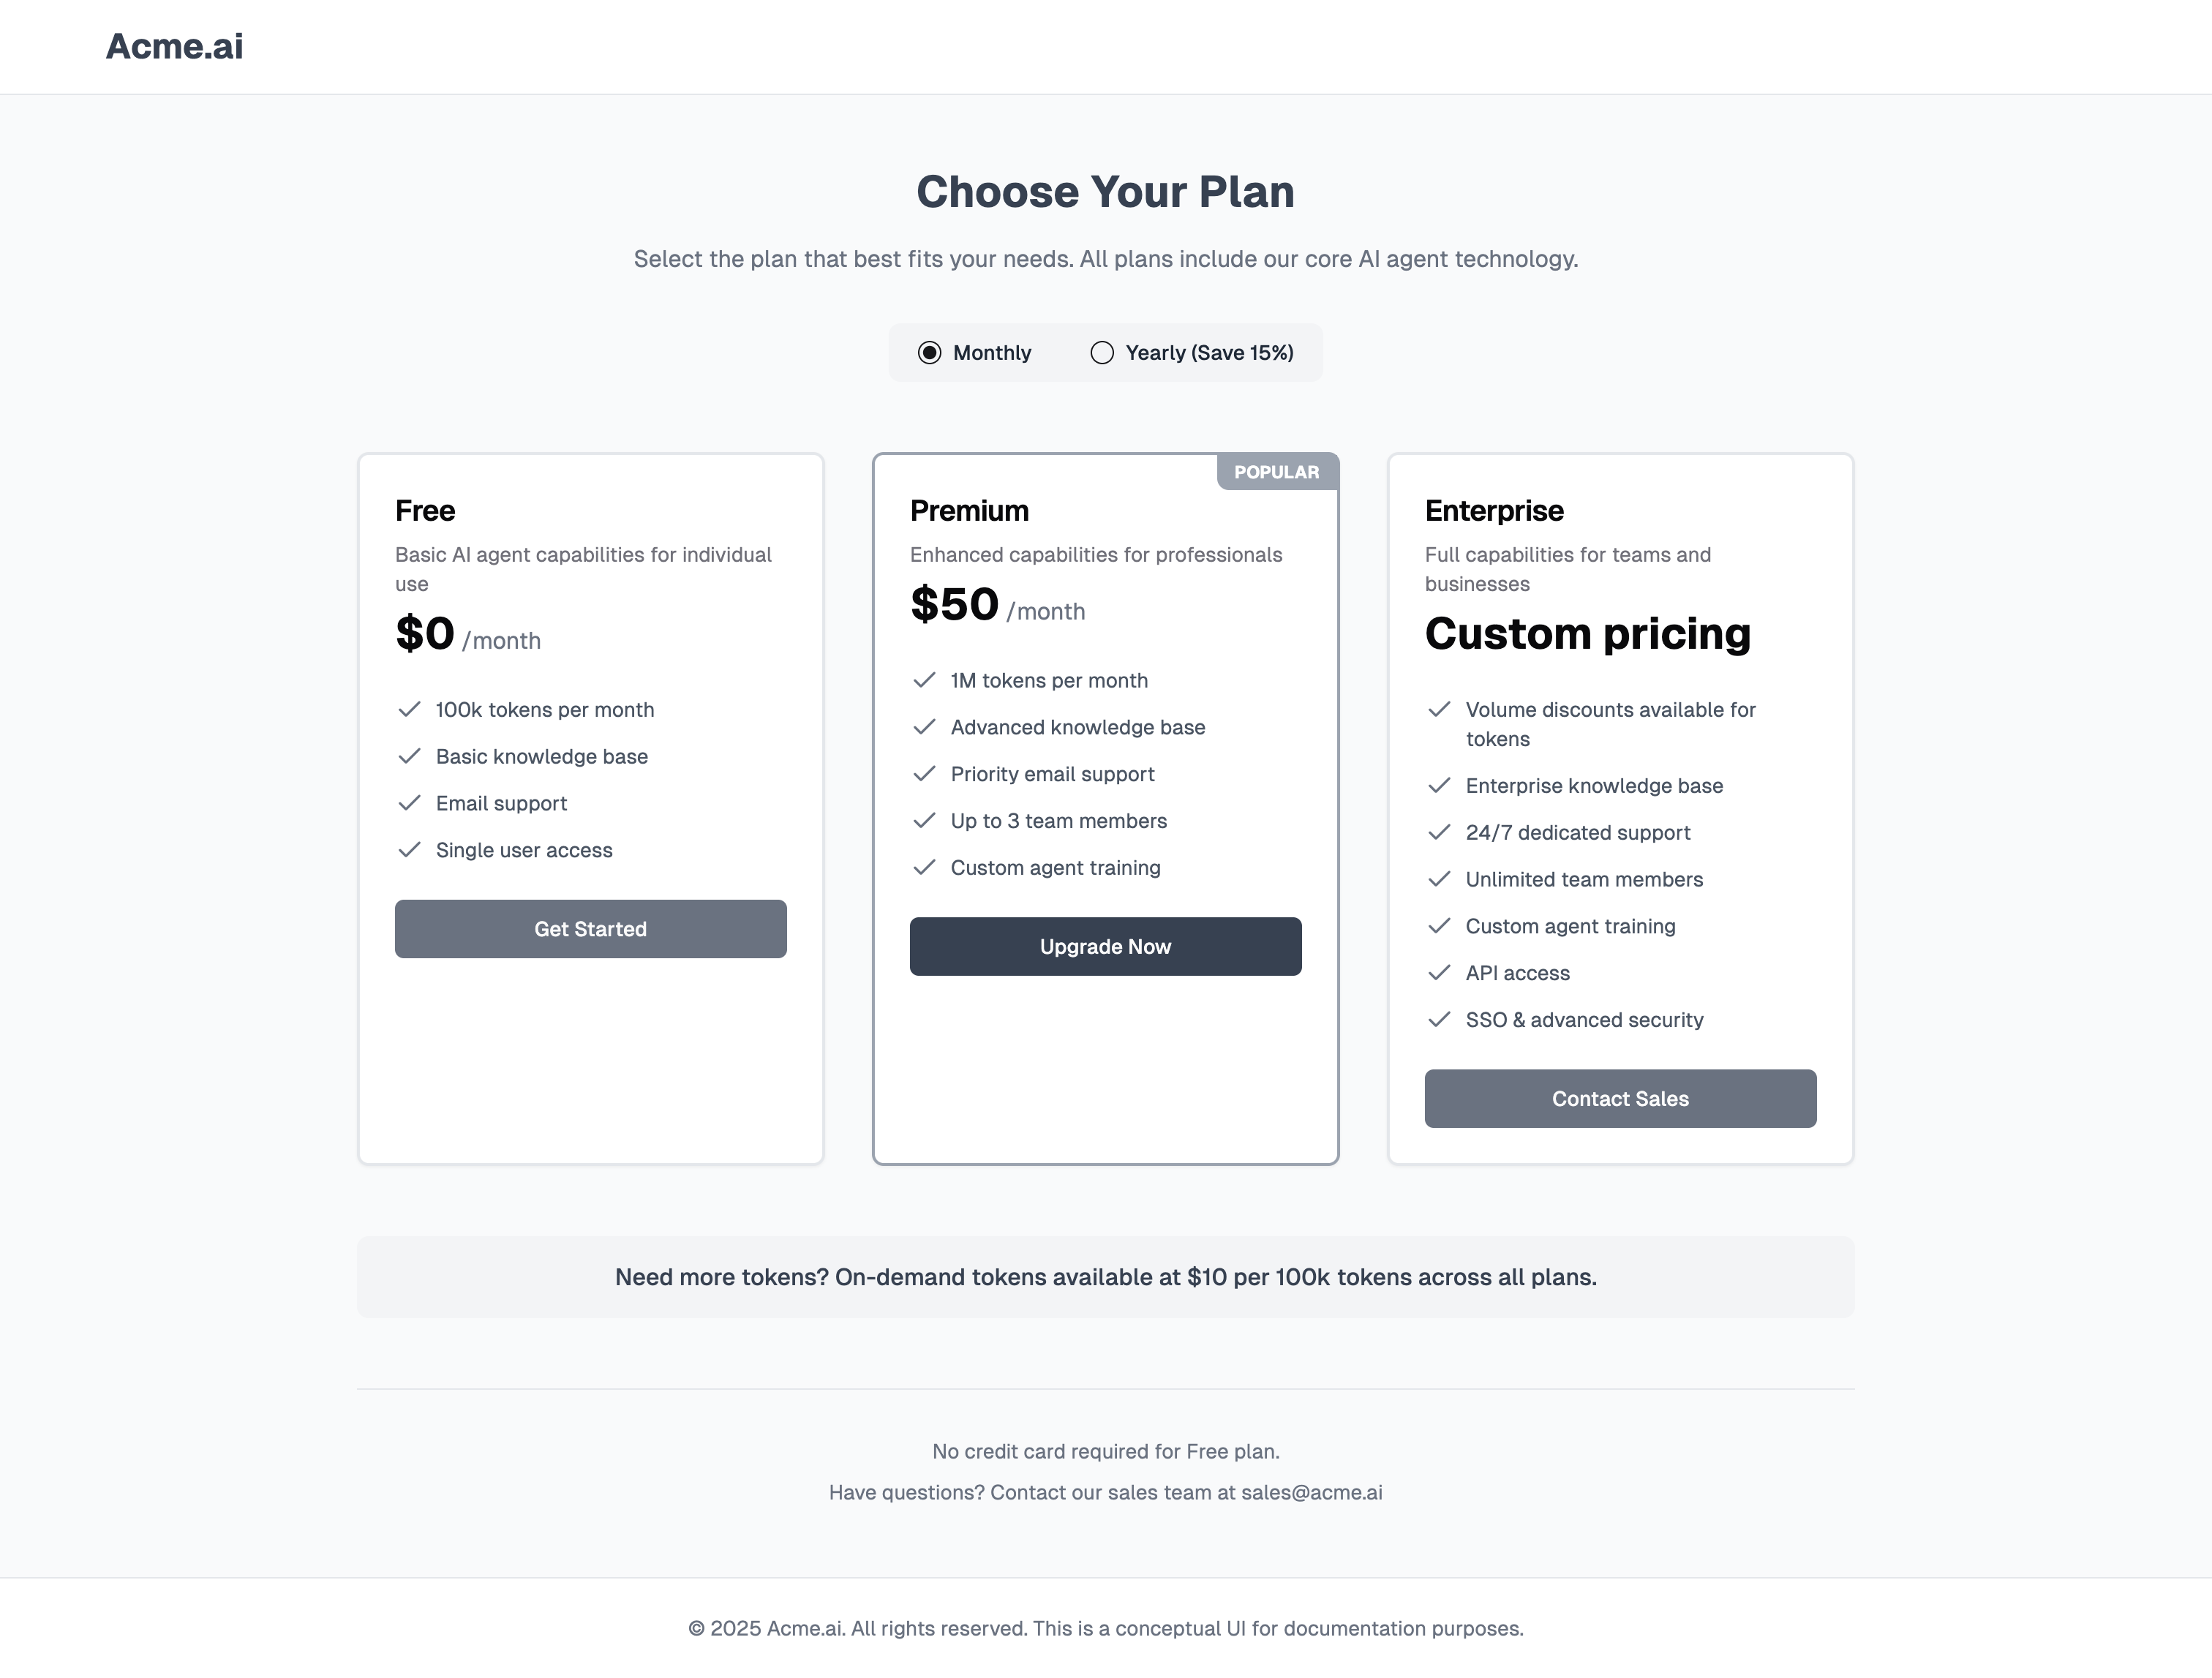 Free tokens that are granted each month will expire at the end of the month, and on-demand purchased tokens will expire one year after they’re granted.
Setting expiration dates for tokens and credits is a best practice that prevents unlimited liabilities in your accounting books.
Be transparent with customers about when their tokens will expire to maintain trust and avoid surprises.
Core modeling
Tracking usage as events
You’ll send a usage event that tracks the consumption of credits from your agent at every agent checkpoint while completing a task.
Decouple product usage from pricing configuration by sending events with raw, real-time usage data instead of rated quantities like dollars or cents. Use Orb’s billable metrics and plan definitions to configure your pricing. This decoupling enables pricing evolution without modifying product code.
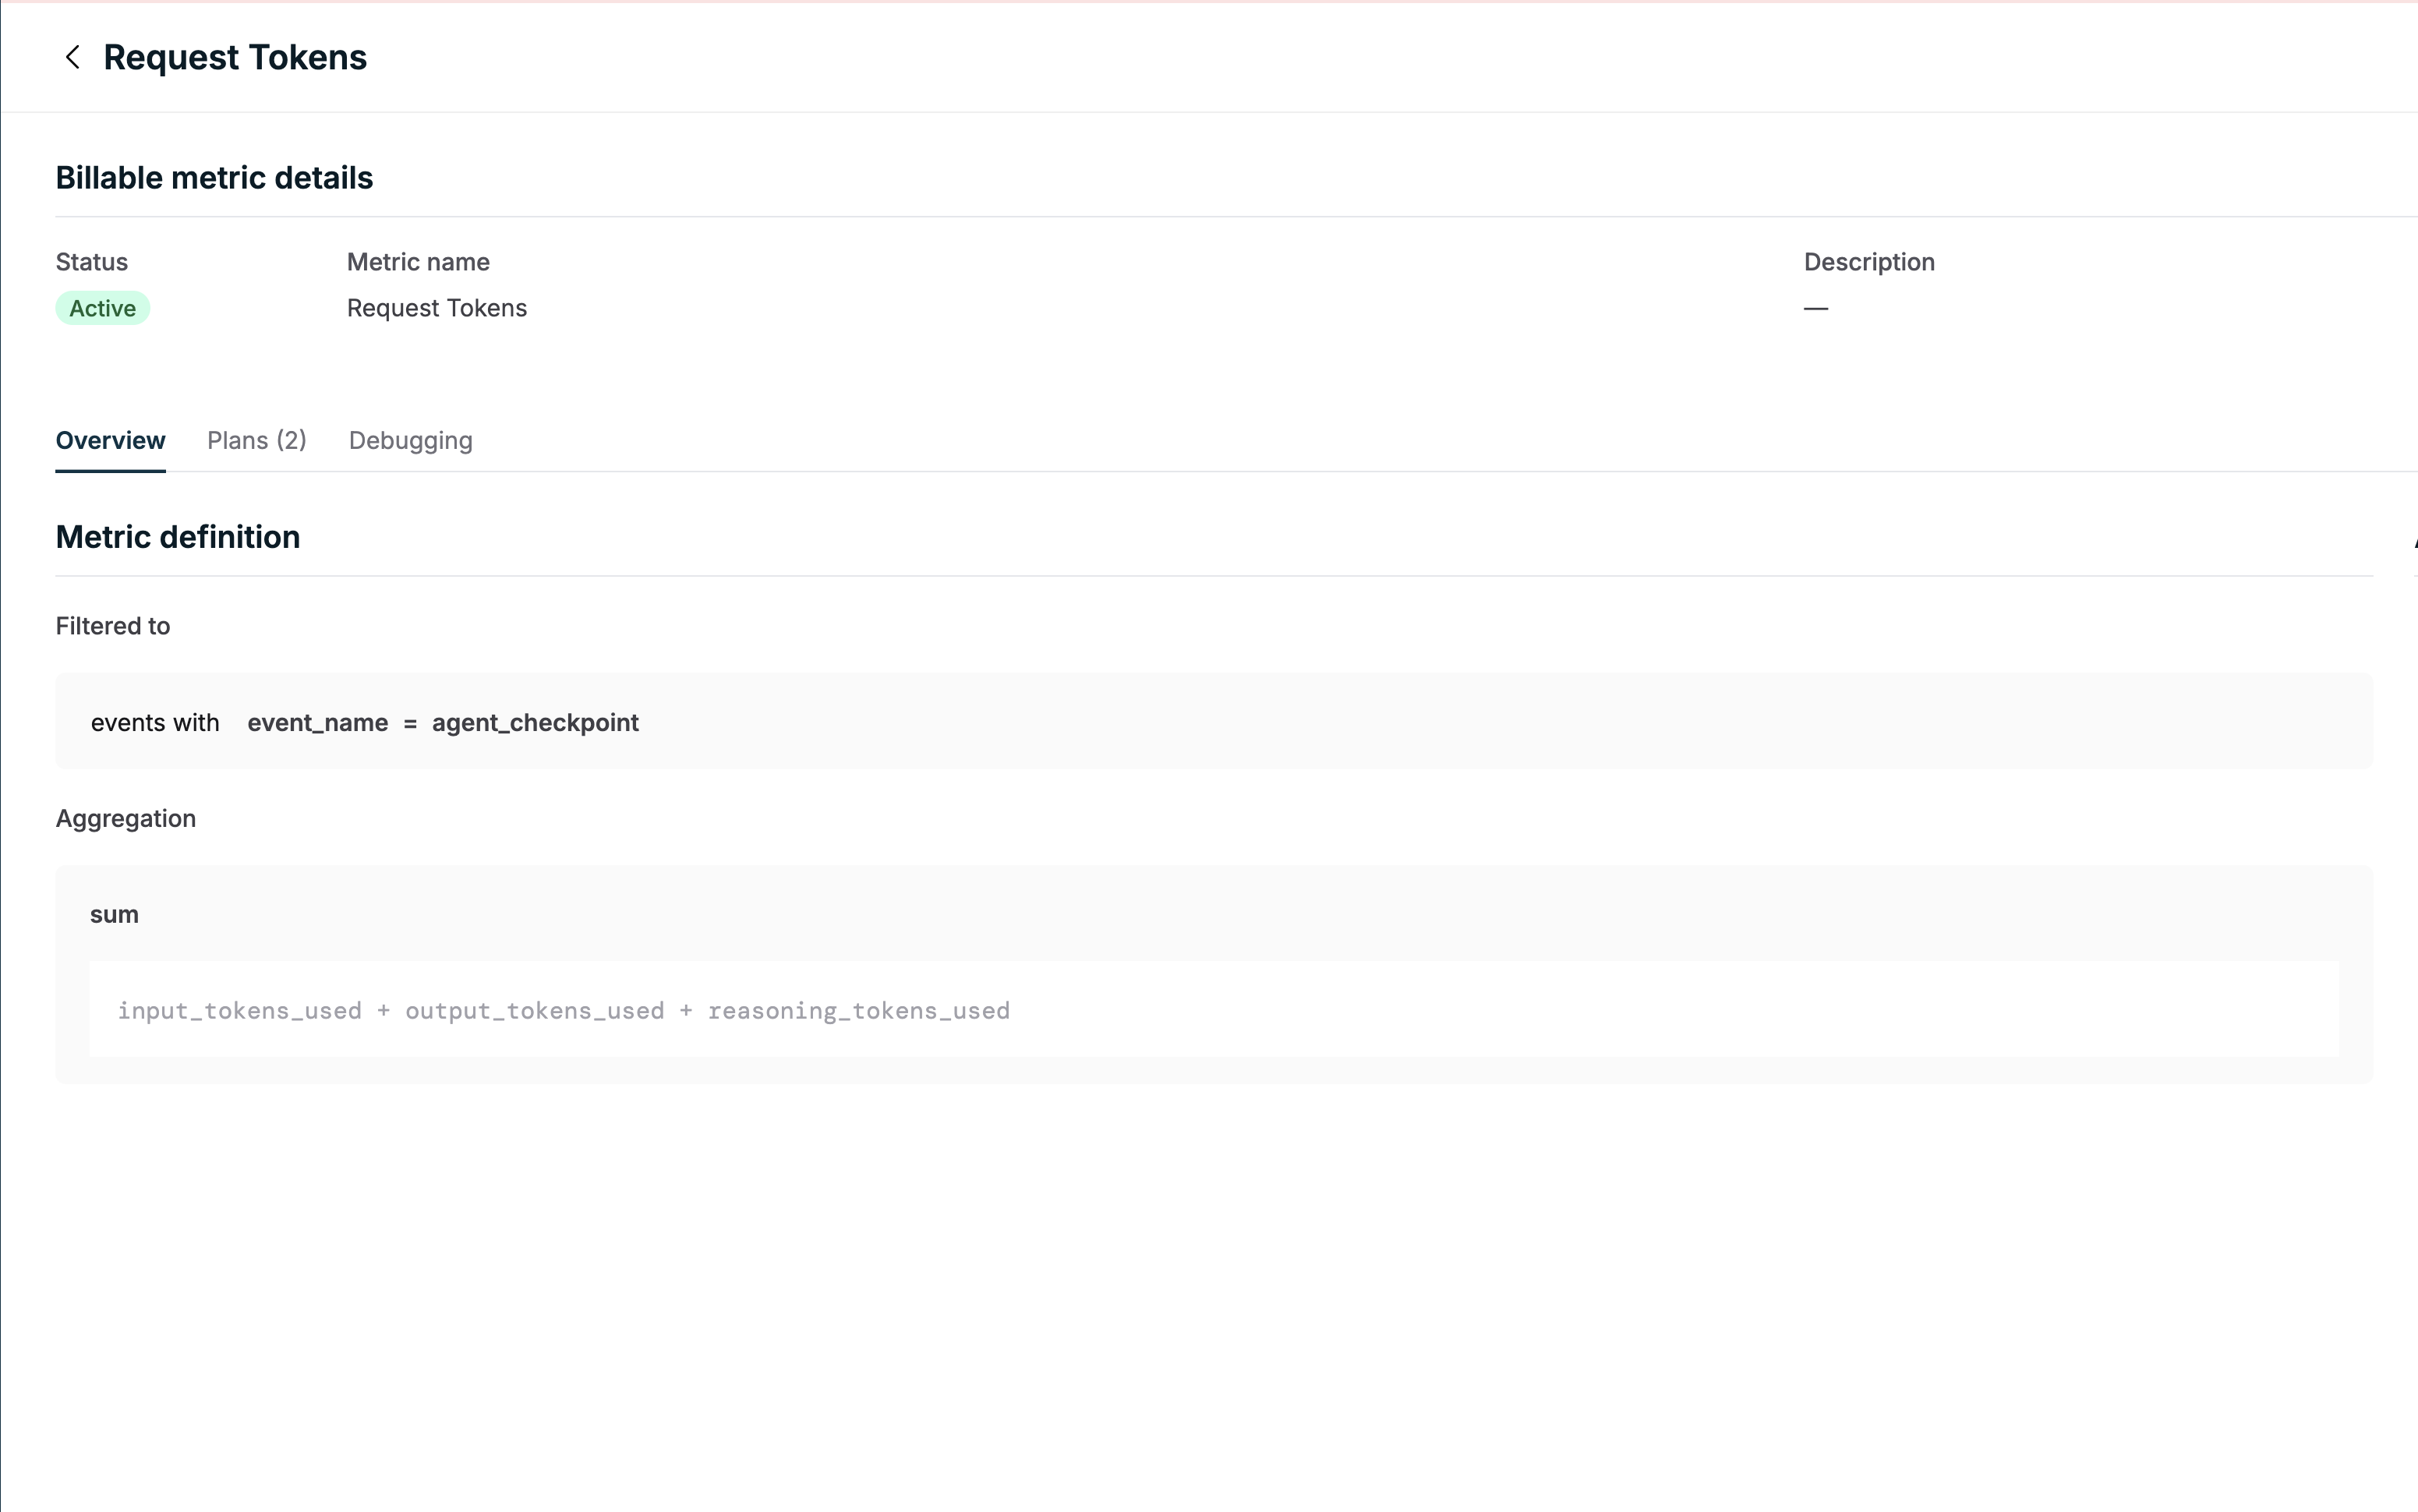
Constructing your metric
For our example metric, we’ll charge based on the total token utilization count across all tasks for a given customer, regardless of model or hardware. The metric will be set up as follows:
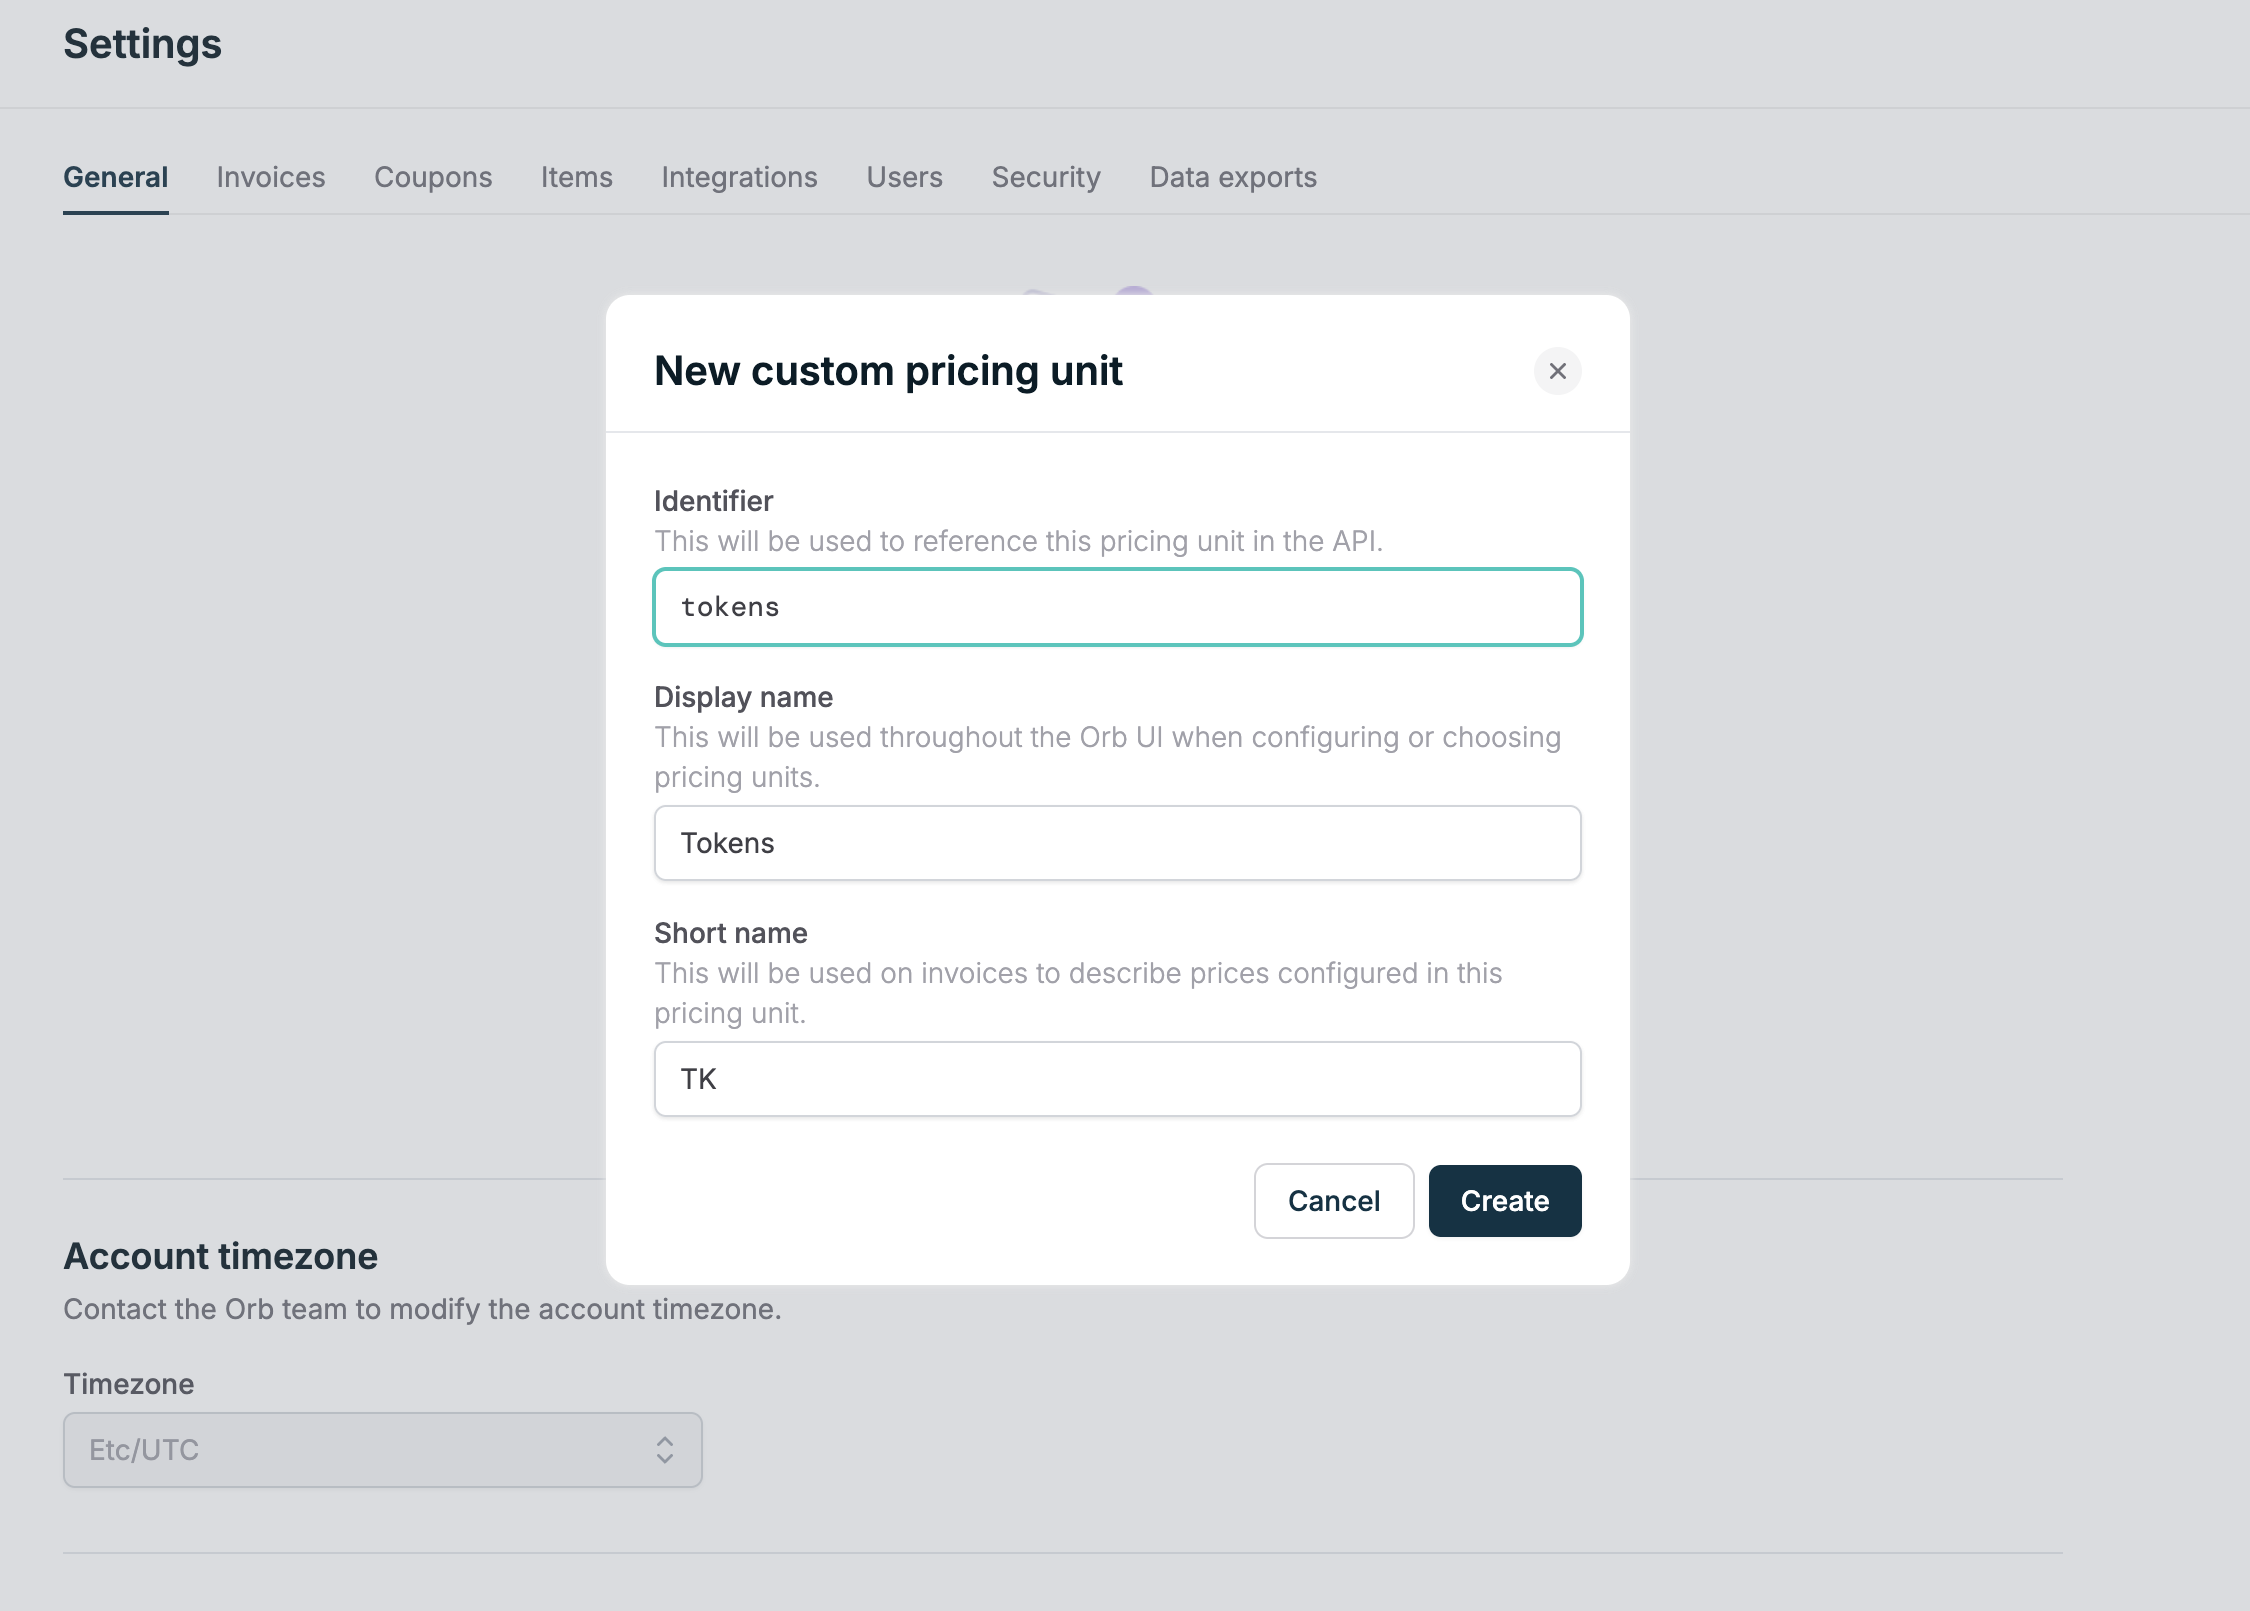
Setting up your pricing model
Create a custom pricing unit called tokens that users accrue when they pay for monthly subscriptions or make top-up purchases. These tokens are consumed whenever an agent is used. Orb’s prepaid credits feature manages this token-based billing model efficiently.
 To model this pricing in Orb, we’ll need two Plans, one that represents the free tier and another that represents the Premium tier. A plan in Orb is a pricing model that you can associate with one or more customers; in our case, each customer will be associated with one of these plans depending on their tier of service.
In order to make referring to these canonical plans easier, set the external_plan_id of these plans to free and premium respectively. Similar to the external_customer_id, this allows you to refer to these plans in your codebase without having to store Orb’s internal plan IDs.
token currency.
The billable metric tracks request tokens directly, so pricing uses a simple 1:1 unit price. Each request token consumed reduces the token balance by exactly one token without any conversion factors.
 Our Premium plan is similar, but includes a $50 monthly fee and 1 million tokens each month that do not rollover.
Customer initial sign-up
Guide your customer through an account creation process and collect basic authentication and profile information. You’ll need to store this in your own application database as well as sync it to third party systems.
Stripe action: Create a Stripe customer corresponding to your customer using the create customer API endpoint. Create the Stripe customer regardless of whether this customer has payment details or is on a paid offering. We recommend you do this asynchronously to avoid increased latency or a chance of errors in your signup flow.
Orb action: When you create the Stripe customer, you’ll receive a customer.created webhook from Stripe (see this guide for setting up webhooks in Stripe). When a customer has been created in Stripe, create the customer in Orb using Orb’s create customer API endpoint.
-
Note that this requires the customer’s name and email address as required fields. Your customer will have an id in your application – pass this as the
external_customer_id to this Orb API endpoint, which will allow you to take all customer-related actions in Orb’s API directly based on this internal id rather than having to store Orb’s created customer ID.
-
Pass
payment_provider=stripe_charge and your Stripe customer ID as payment_provider_id to this Orb endpoint. This step associates the Orb customer with the Stripe customer, allowing Orb to later pull in payment method information and trigger charges on your behalf.
-
The Orb customer creation should happen on your backend and be asynchronous (i.e. non-blocking) to your application’s sign-up process. This is important to avoid additional latency and error handling in your critical initial sign-up process.
Upon creating the customer, also create a credit_balance_depleted and credit_balance_recovered alert using the alert creation API. Note that the currency of these alerts should be set to token, corresponding to your pricing setup. We’ll explain this below, in the section on customer spend controls.
As part of your new user onboarding process, your customer will pick whether to continue on the Free plan, or immediately upgrade to the paid Premium offering. Both the Premium offering and the ability to activate top-ups will require collecting payment method information.
In the event that the user picks the Premium plan, you’re responsible for collecting their payment method information and storing it in Stripe as the customer’s default payment method. Orb will trigger payments against this saved payment method, and automatically track changes to the default payment method for future payments.
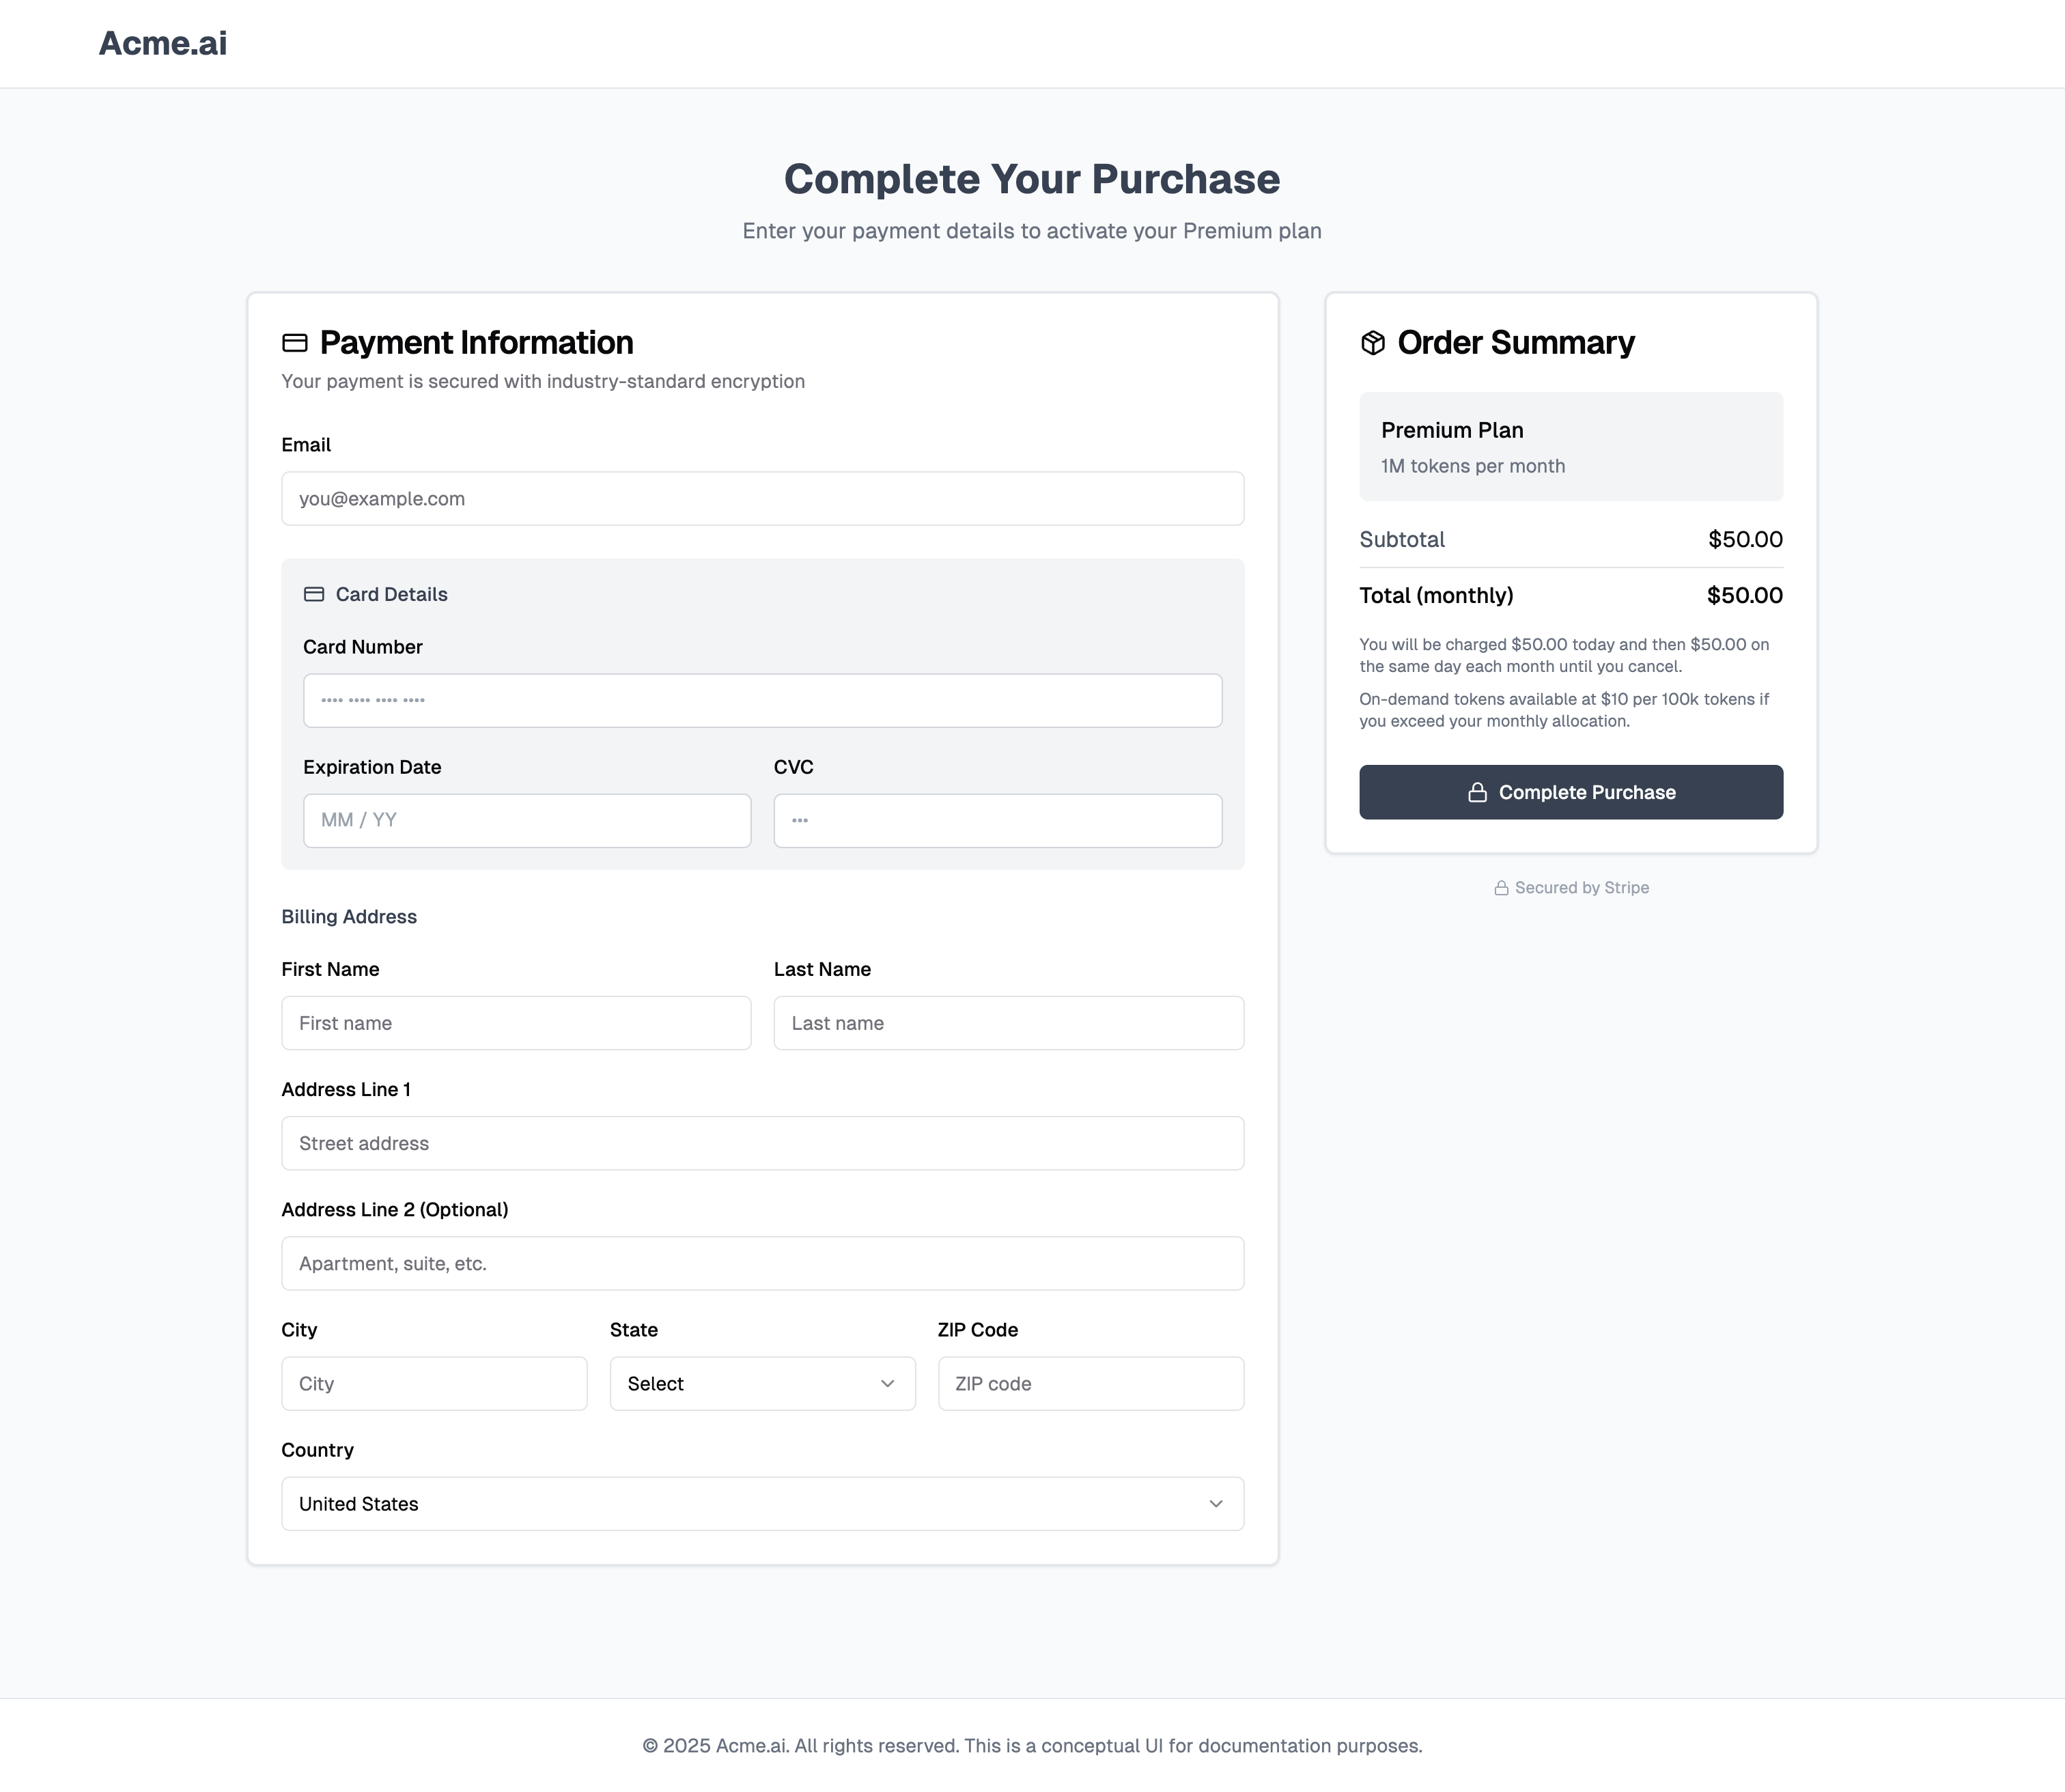
Setting up Stripe payment method with SetupIntent flows
Collect their payment information via Stripe Elements following this guide. Although Stripe’s hosted checkout flow is also an option, we recommend Stripe Elements for their ability to customize and embed the form directly into your experience:
-
The payment information you’re collecting should be usable for future, recurring payments that Orb will trigger on your behalf.
- Payment information should be attached to the customer’s corresponding Stripe customer object and be set up for future use.
-
When creating the
SetupIntent (required on the server-side before you confirm the setup process on the client), make sure to associate the intent with the Stripe customer. Set usage=off_session.
-
Use a Stripe Element with mode
setup – you’re just collecting the user’s payment method, not collecting immediate payment through this flow. Pass setupFutureUsage: off_session as an option to ensure that the appropriate payment methods are displayed to your user.
-
Collect the billing address details using the address element – when you choose to charge tax in the future, this will be a critical piece of information required for each customer
-
Submit the setup by calling
stripe.confirmSetup on your client side, passing in the clientSecret returned by creating the SetupIntent.
Ensure that the SetupIntent successfully sets the Stripe customer’s invoice_settings.default_payment_method to the collected payment method. When triggering charges, Orb uses customer.invoice_settings.default_payment_method, falls back to customer.default_source, and if neither is set, will automatically use the most recently created payment method attached to the customer. Do this by listening to the setup_intent.succeeded webhook and ensuring that the customer’s newly attached payment method is set as the default payment method.
Once you’ve updated the Customer’s default payment method, Orb will sync that payment method as the preferred payment method for future charges.
For complete details on payment method selection logic and best practices, see Payment method selection.
Address synchronization: In addition to payment method information, Orb can automatically keep customer addresses synchronized with Stripe. When you link an Orb customer to a Stripe customer, Orb will automatically pull the customer’s billing and shipping addresses from Stripe and update the corresponding Orb customer record. Additionally, Orb can be configured to automatically sync any address changes via Stripe’s customer.updated webhook, ensuring that billing and shipping information remains consistent between both platforms without manual intervention. This automatic synchronization helps maintain accurate customer information for tax calculations, invoice delivery, and compliance requirements. For more details on configuring address syncing, see the Stripe integration documentation.
Configuring payments and invoicing
Your customers can expect to receive two types of invoices given our pricing model:
A recurring charge for their subscription tier. Free customers will not be invoiced for recurring charges, but Premium customers will receive a $50 monthly invoice.
Charges for credit purchases. These may either be automatically triggered through the top-ups mechanism or through a manual credits purchase through your product dashboard.
Configure the following settings in your Orb instance as a baseline:
-
Fill in ‘Company Details’ – this name and address information will be populated on your invoices.
-
Upload your logo – this is used to brand your invoice PDFs, invoice emails, and Orb invoice links
-
Set your invoices to automatically issue under ‘Invoice Control’.
-
Enable payment failure recovery (also known as dunning). Orb will automatically retry payments on a fixed schedule when they fail, and smartly retry failed payments when a payment method is updated.
Because our pricing hinges entirely on a prepaid tokens model, we don’t expect to ever charge our customers for ‘pay as you go overage’ at the end of each billing cycle. As a result, free plan invoices will still be generated but automatically marked as paid each month. Similarly, invoices for the Premium plan will include a $50 fee for the monthly recurring charge, but a $0 line item for usage charges which will have been otherwise paid.
One-off credit purchases
If your customer wants to purchase more tokens on either plan, you should add and invoice those tokens through Orb. In order to do this, increment credits using the create ledger entry endpoint, passing in the following parameters:
-
Set the currency to
token.
-
entry_type = increment signifies an increment in tokens
-
amount represents the additional tokens being bought. For our pricing model, ensure that this is a multiple of 100K.
-
per_unit_cost_basis represents the cost of each token in your invoicing currency, USD. Because the purchase rate of tokens is $10 per 100K tokens, set this to $0.0001.
-
expiry_date represents when the tokens will automatically be depleted. Set this to one year from the grant (current) date.
-
To ensure credits are billed immediately and granted conditional on payment success, set
invoice_settings.auto_collection to True, invoice_settings.require_successful_payment to True, and invoice_settings.net_termsto 0.
Once a purchase has been triggered through this endpoint, credits will automatically be granted to the customer on payment and be usable for your agent’s runs.
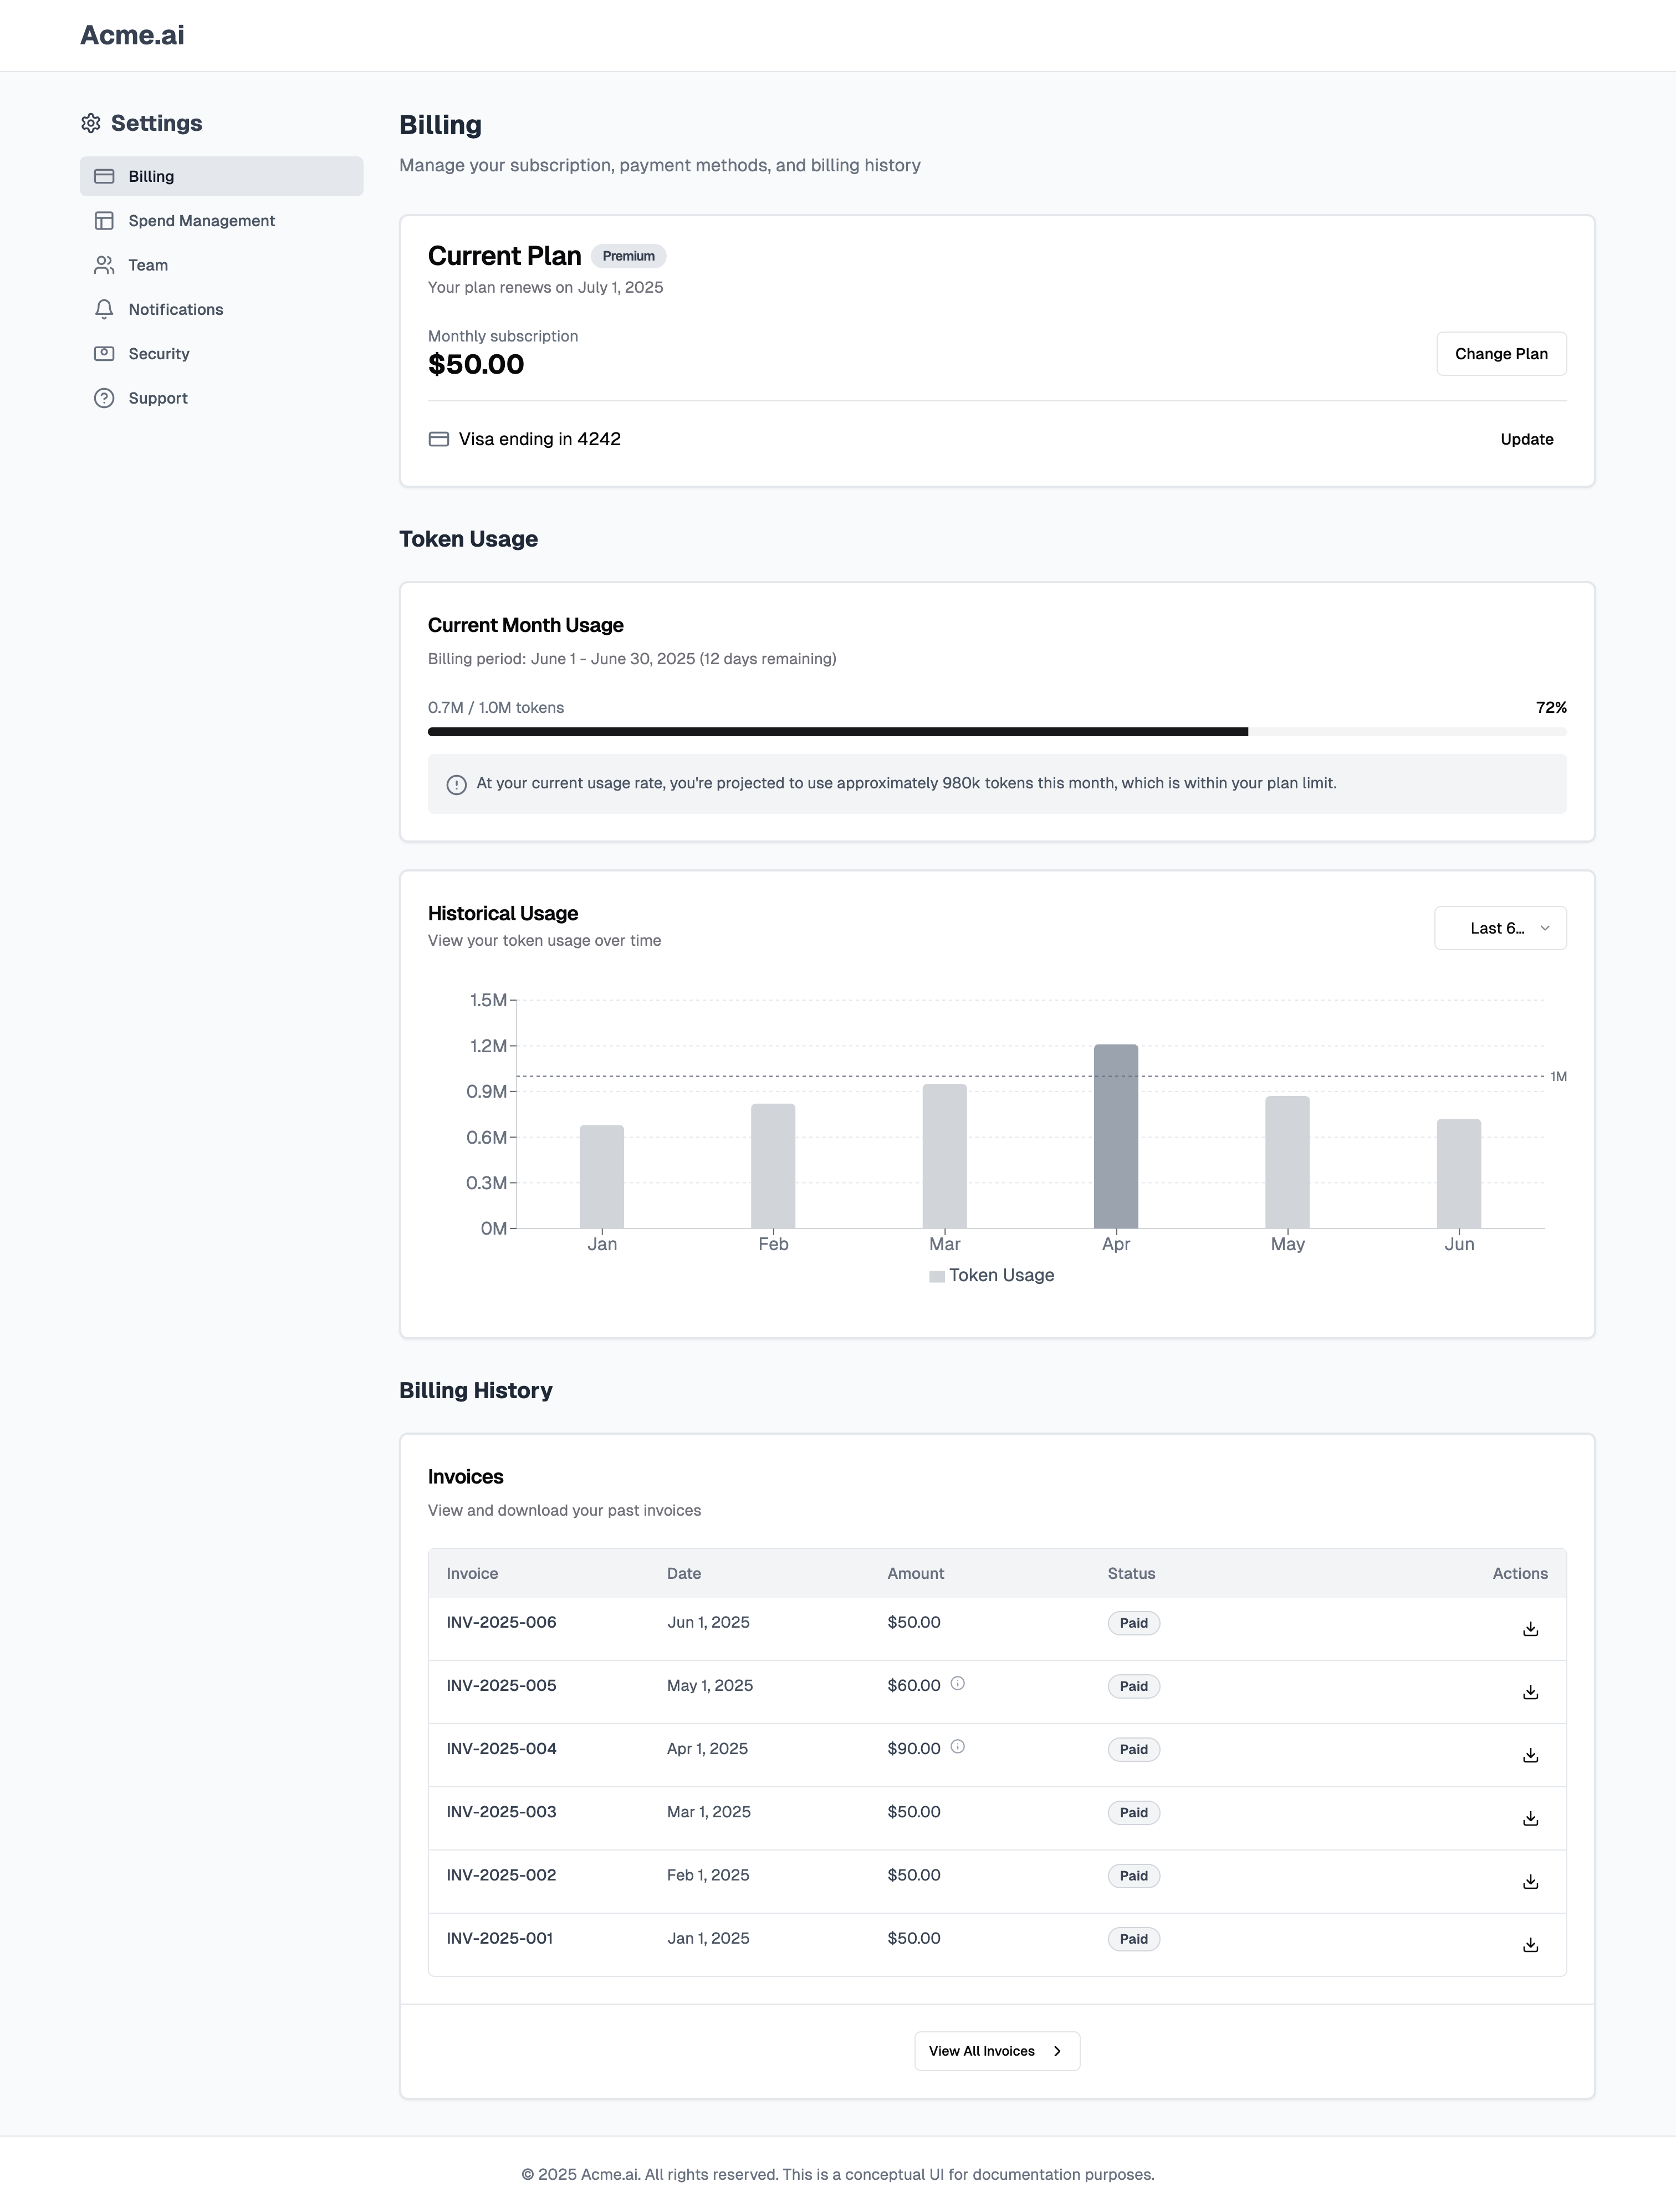
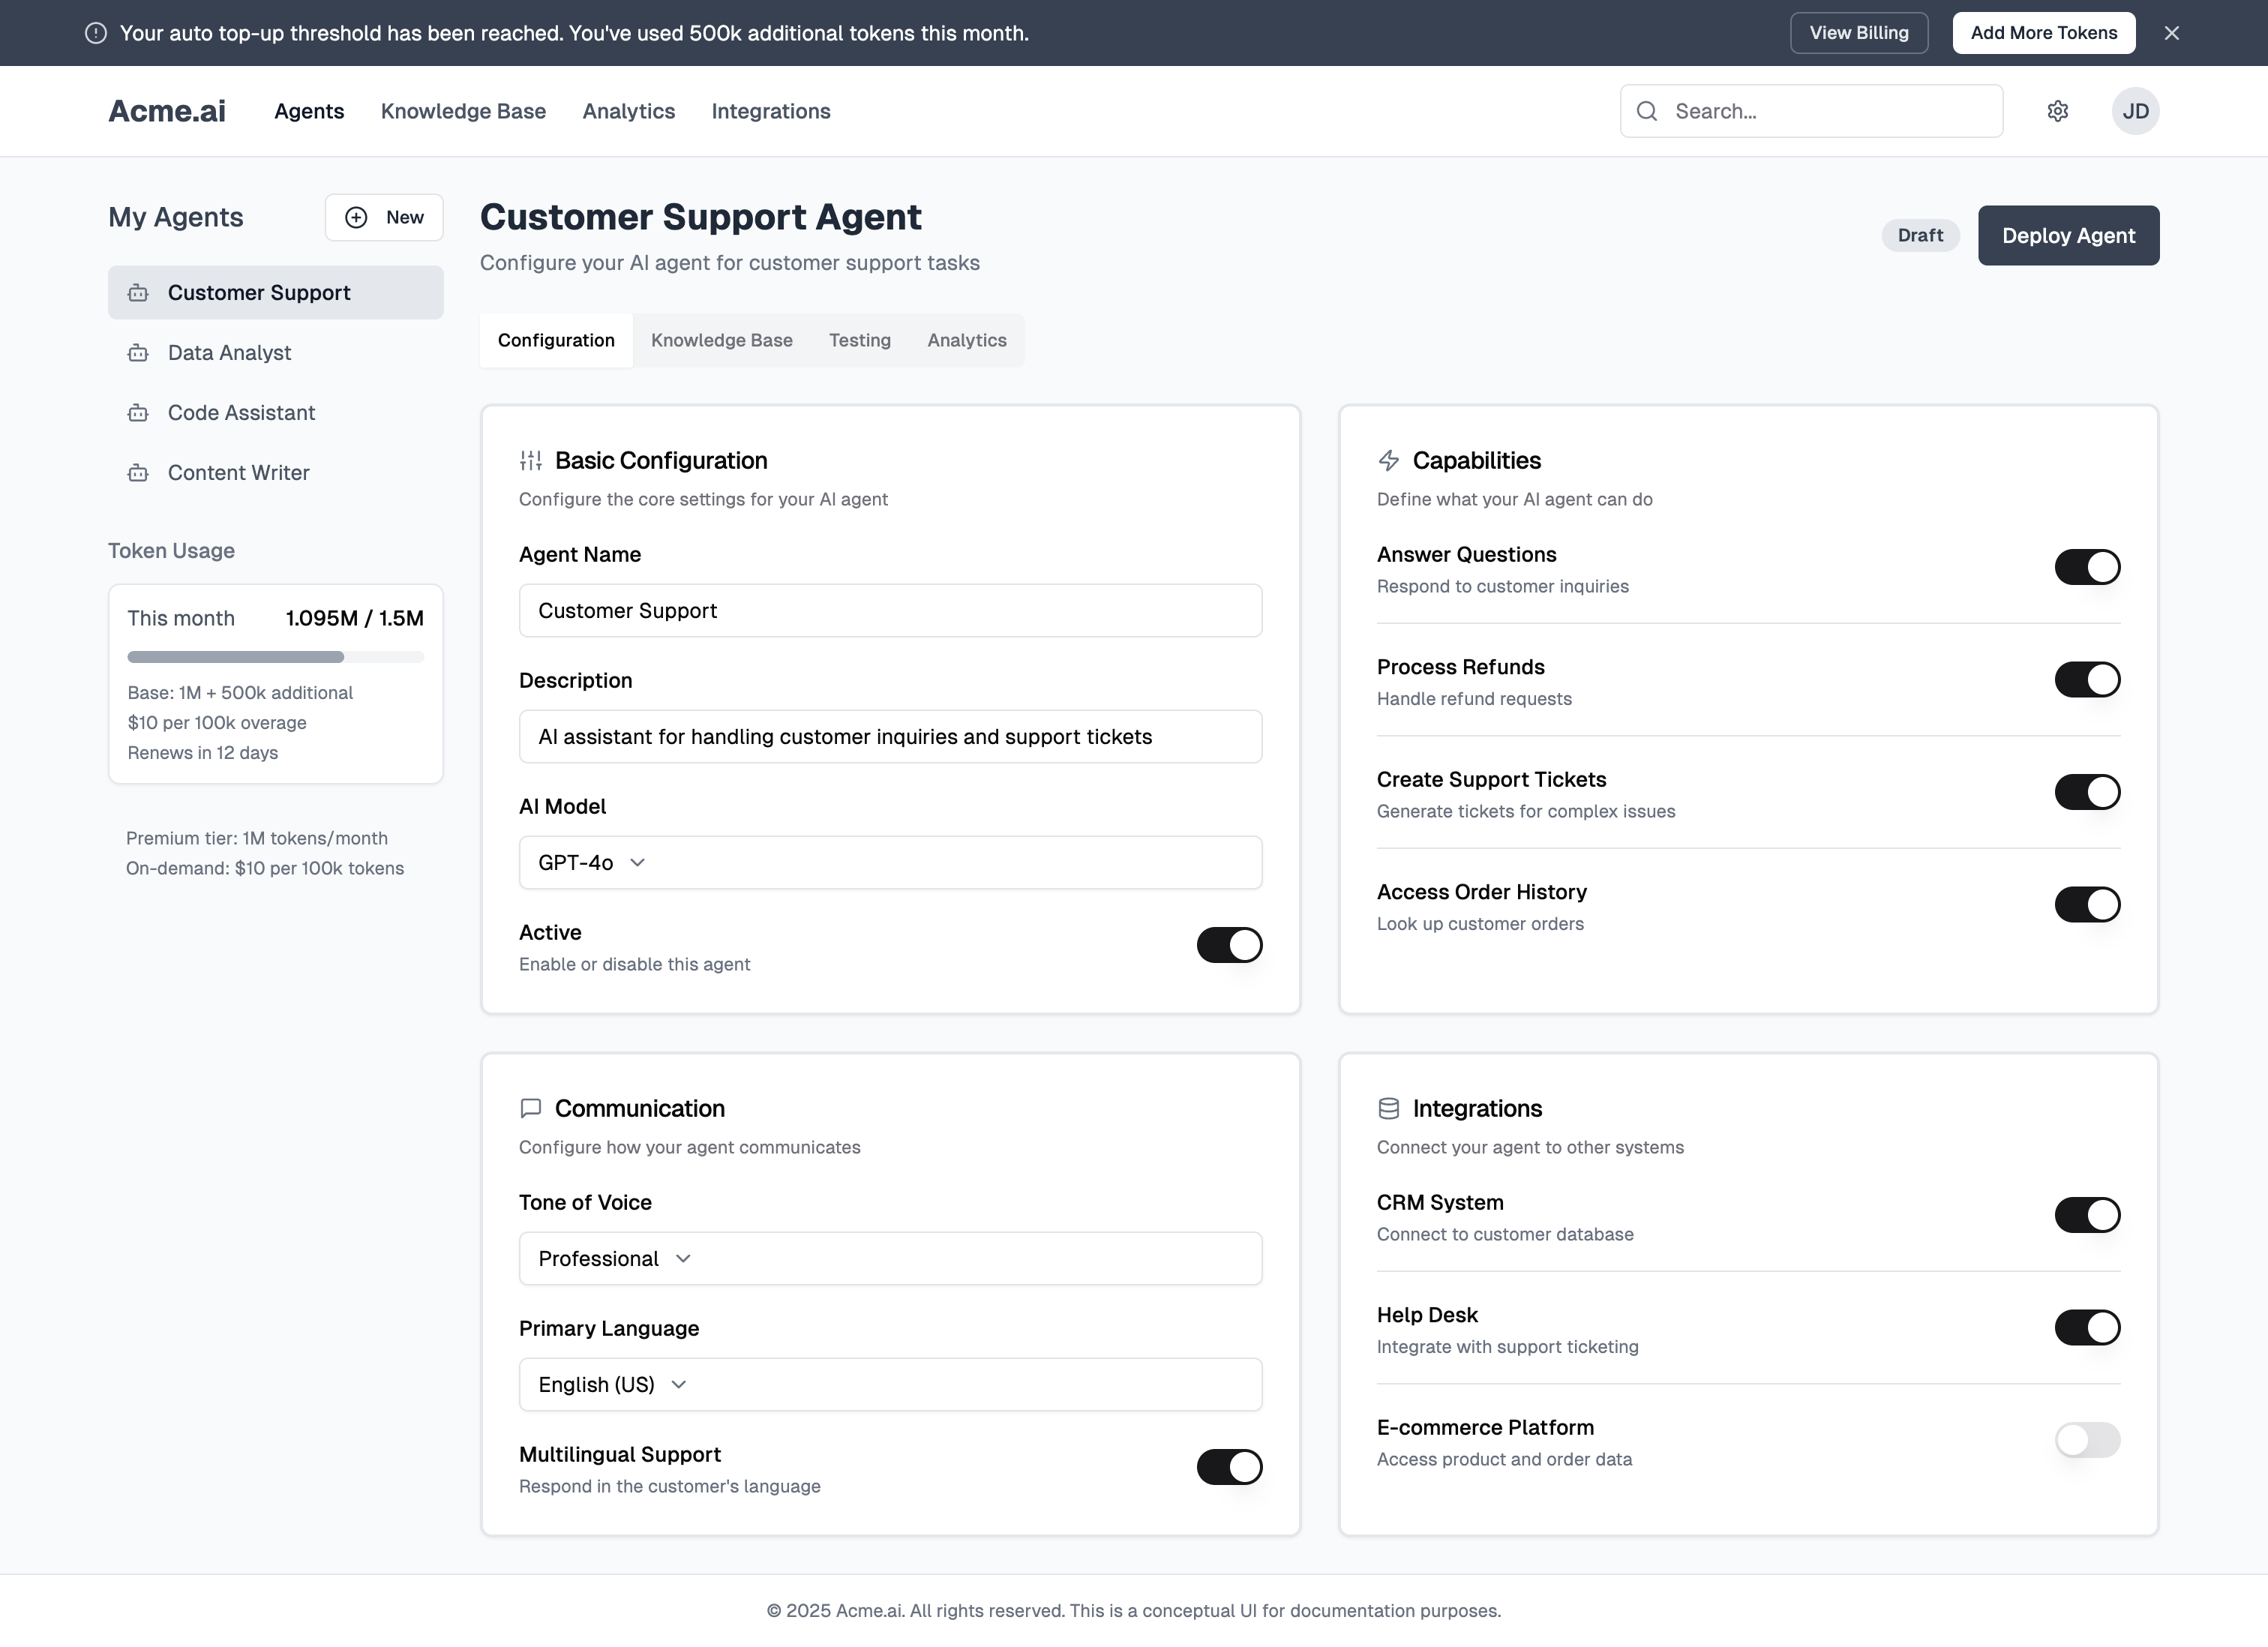
Customer usage visibility
Providing real-time customer spend visibility is extremely important. In our agent pricing, users should understand:
-
Tokens used in the current cycle as well as historically
-
Previously issued invoices, including those for top-up charges
In order to understand charges for the current cycle, use Orb’s upcoming invoice API. The upcoming invoice is the invoice for the current billing cycle, so it will represent how credits have been utilized in the current period. In order to make sure your dashboard is performant and responsive, we recommend using Orb’s Orb-Cache-Control header, passing Orb-Cache-Control: cache as a directive. Asynchronously, you can rehydrate this data without the header and automatically refresh live usage data.
In the upcoming invoice response, filter to the line item that represents your token utilization price and use the line_items serialization’s credits_applied field to show the number of tokens used in the current billing cycle.
In addition, you should list the customer’s invoices by using the list invoices endpoint filtered to your customer’s external_customer_id. With this response, you’ll be able to:
-
Extract historical token usage by parsing the
line_items[].credits_applied field for invoices that correspond to recurring subscription charges. You can identify these invoices by the presence of invoice_source=subscription.
-
List all historical invoices in a table format. We recommend that you annotate this table with payment status (the
invoice.status field) as well as explicitly annotate invoices that were a result of credit purchases (invoice_source=one_off).
Customer spend controls
Self-serve customers should be able to control and manage their spend. We’ll provide the following mechanisms:
-
Credit balance alerts so that your customers are notified when their token balance reaches a specified threshold.
-
On customer sign-up, you’ve already created an alert for balance depletion and balance recovery.
-
If your user wants to opt-in to an additional alert threshold, use the create customer alert endpoint on-demand from your server to configure additional alert. The customer threshold should be set in the thresholds object array, and the currency should be set to token.
-
After having configured an alert, Orb will send your webhook receiver a webhook event when relevant state change happens – use this webhook to trigger an email notification to your customer. Additionally, use the webhook to either disable or enable agent functionality if the balance is depleted or recovered, respectively.
-
Automatic top-ups, to ensure that additional tokens can be purchased without intervention when the customer’s token balance is low. Top-ups should be opt-in and disabled by default.
-
If a customer opts in to top-up behavior, configure the top-up for the token currency by using the create top-up endpoint. Note that this requires a threshold configuration (this is the ‘breach’ point at which a top-up will be triggered) and an amount. Set the amount to always be 100,000 and configure the threshold according to user preferences.
-
To ensure that payment for top-ups happens immediately and the grant of tokens is conditional on payment, set
invoice_settings.require_successful_payment to True, invoice_settings.auto_collection to True, and invoice_settings.net_terms to 0.
-
In order to allow the user to manage potential runaway spend, allow configuring a max top-up limit. When a number of top-up triggers is hit, disable the top-up by calling deactivate on the top-up.
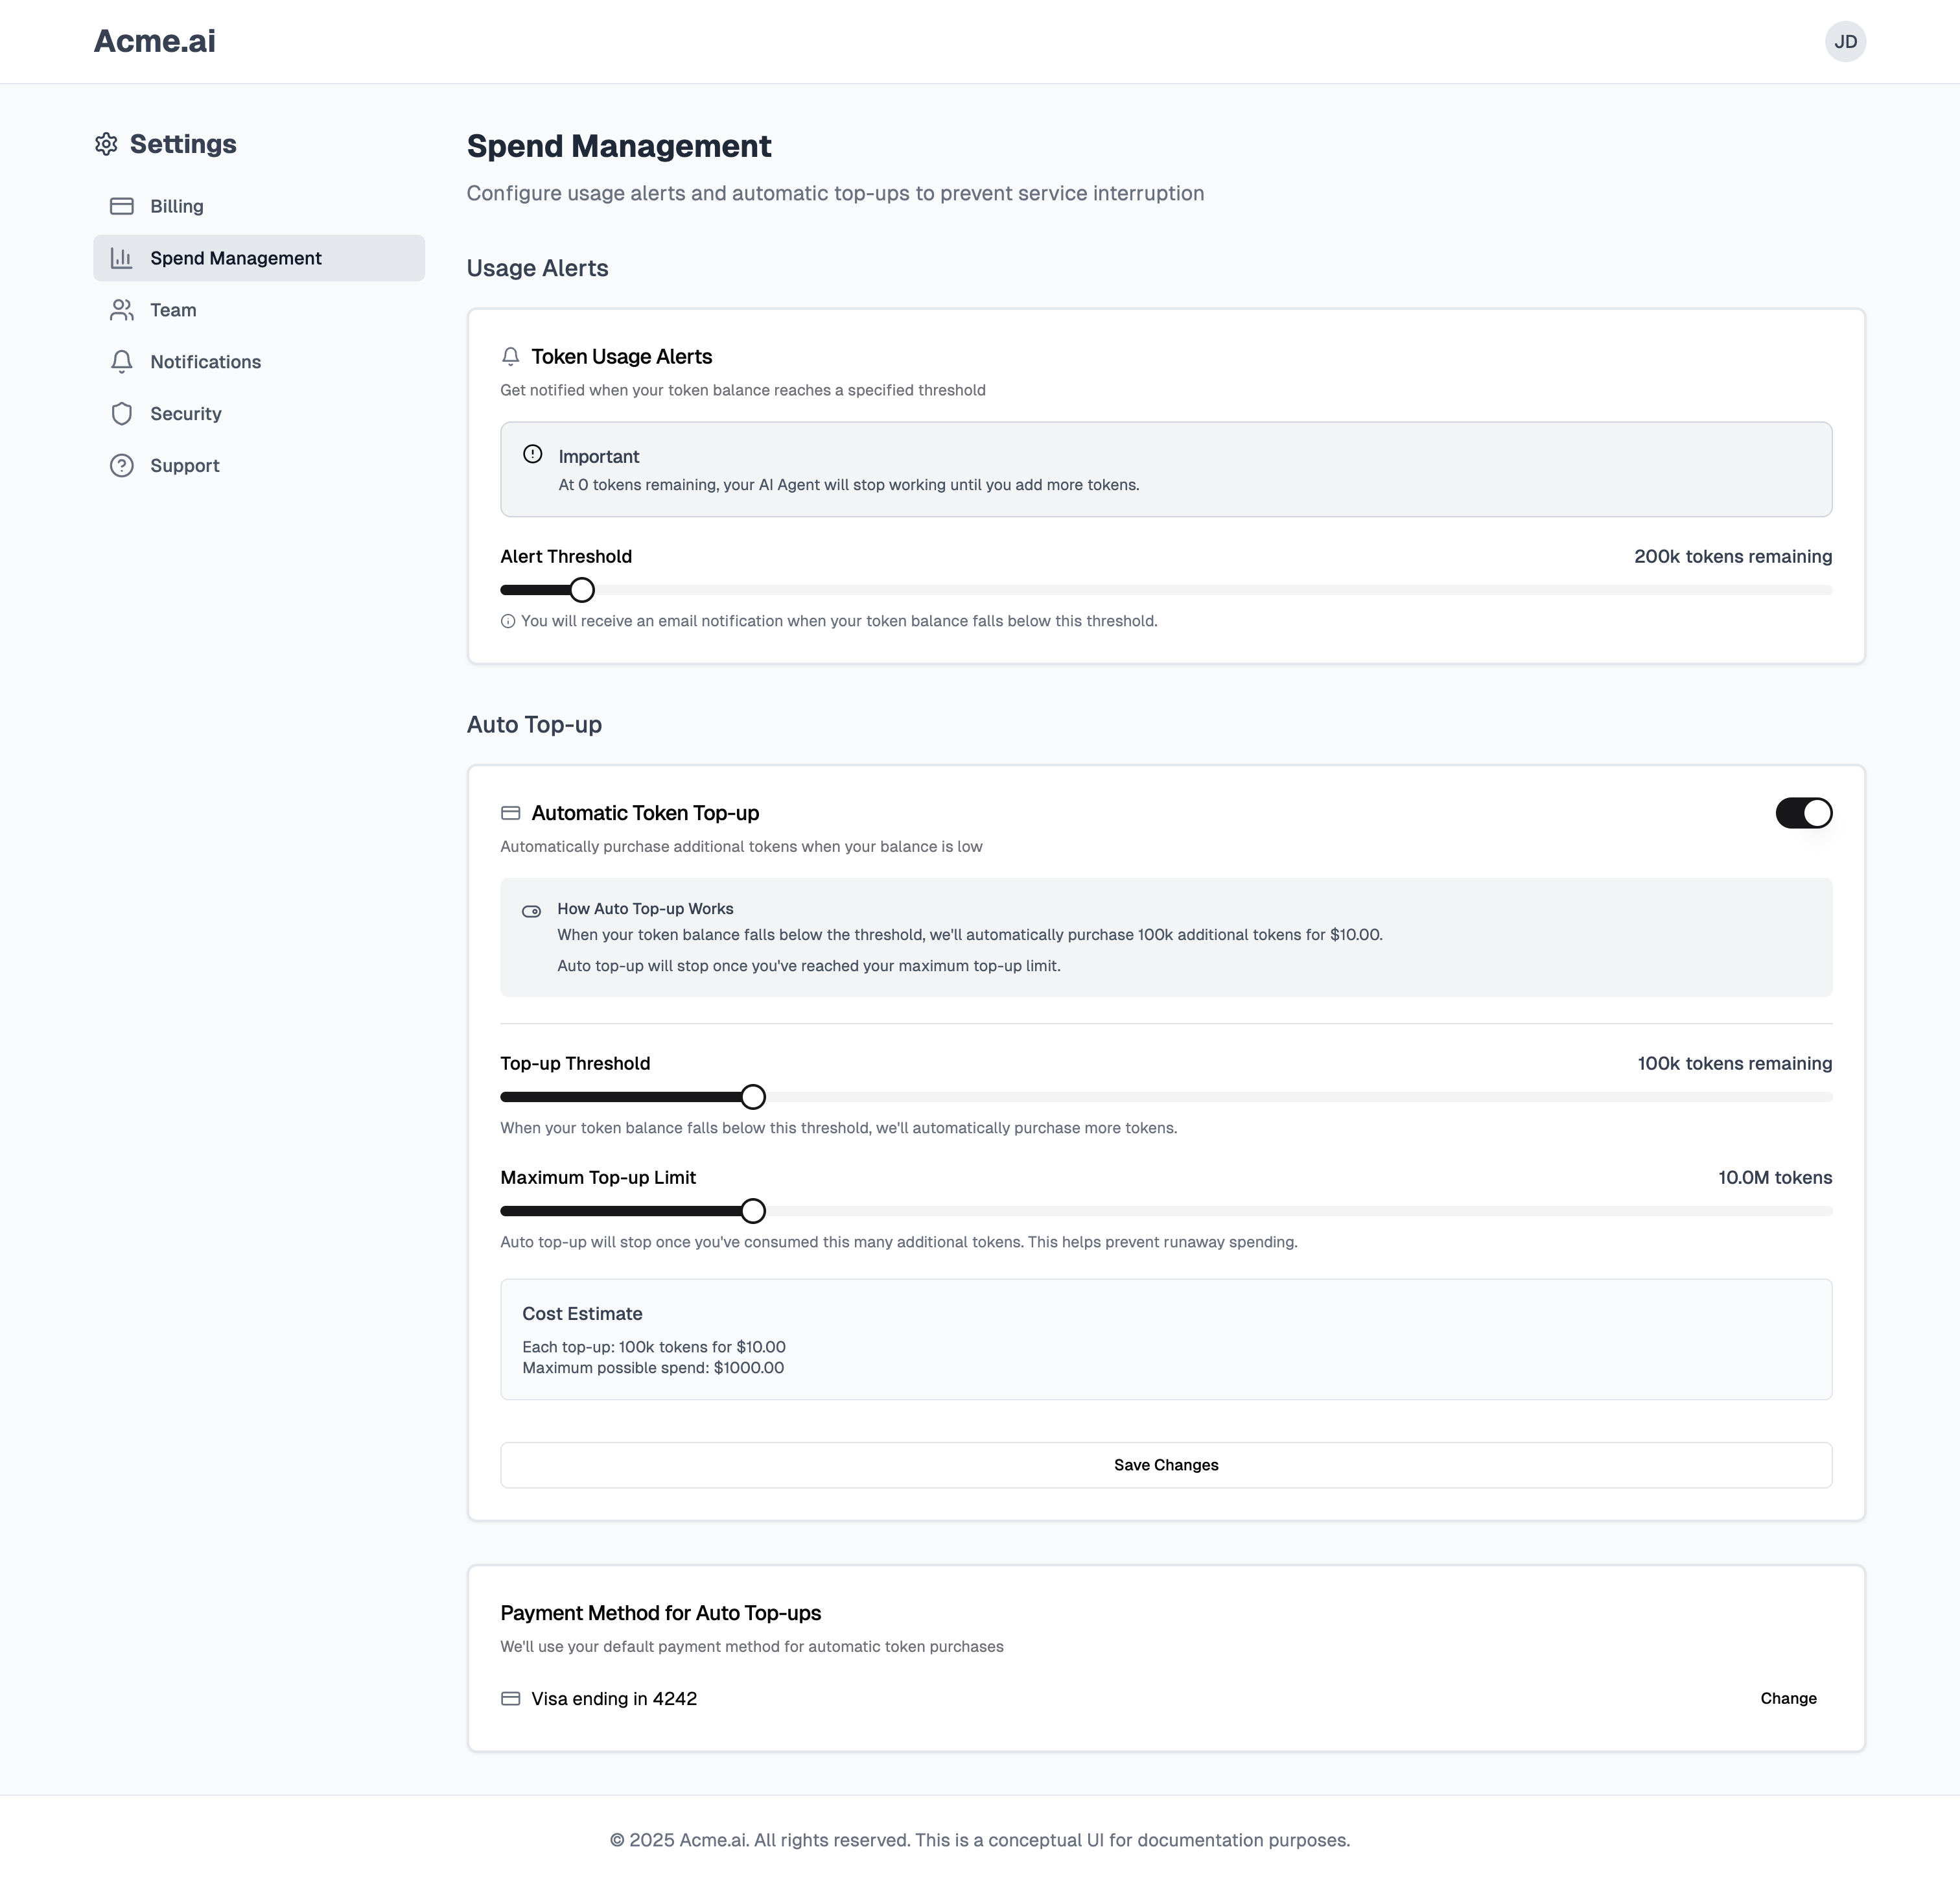 Ensure that you notify your customers when their auto top-up threshold is hit, and consider notifying them prominently that they have additional credits beyond their tier’s allotment in the current billing cycle.
Upgrades, downgrades, and cancellations
There are several subscription management flows you’ll want to support between the Free and Premium tier of your app.
Cancellation of the Premium tier
If your customer cancels Premium, execute a plan change operation in Orb, with the free plan as the target plan passed via the external_plan_id=free body parameter. Because the user has already paid for their credit allotment for the current month, pass change_option=end_of_subscription_term. This will schedule the plan change so that future charges no longer apply.
Note that you should not reclaim or expire any existing credits; by default, credit allocations on Premium expire within a month and ad hoc credit purchases should remain until their original expiration date.
Upgrade from Free to Premium tier
If your customer upgrades from Free to Premium, execute a plan change operation in Orb, with the Premium plan as the target plan passed via external_plan_id=premium body parameter. Because the user expects an upgrade in service immediately, pass change_option=immediate.
Furthermore, set the billing_cycle_alignment=plan_change_date to ensure that the user is charged $50 on upgrade. This will transition the subscription to Premium, and automatically issue the $50 invoice for in-advance charges.
In order to show the previewed charges as the result of the upgrade (especially for more complicated cases that involve prorated charges), you can dry-run the plan change when first loading the checkout flow by passing the header Orb-Dry-Run: true. In addition, pass Include-Changed-Resources: true to fetch a preview of created invoices in the response.
Manual operations
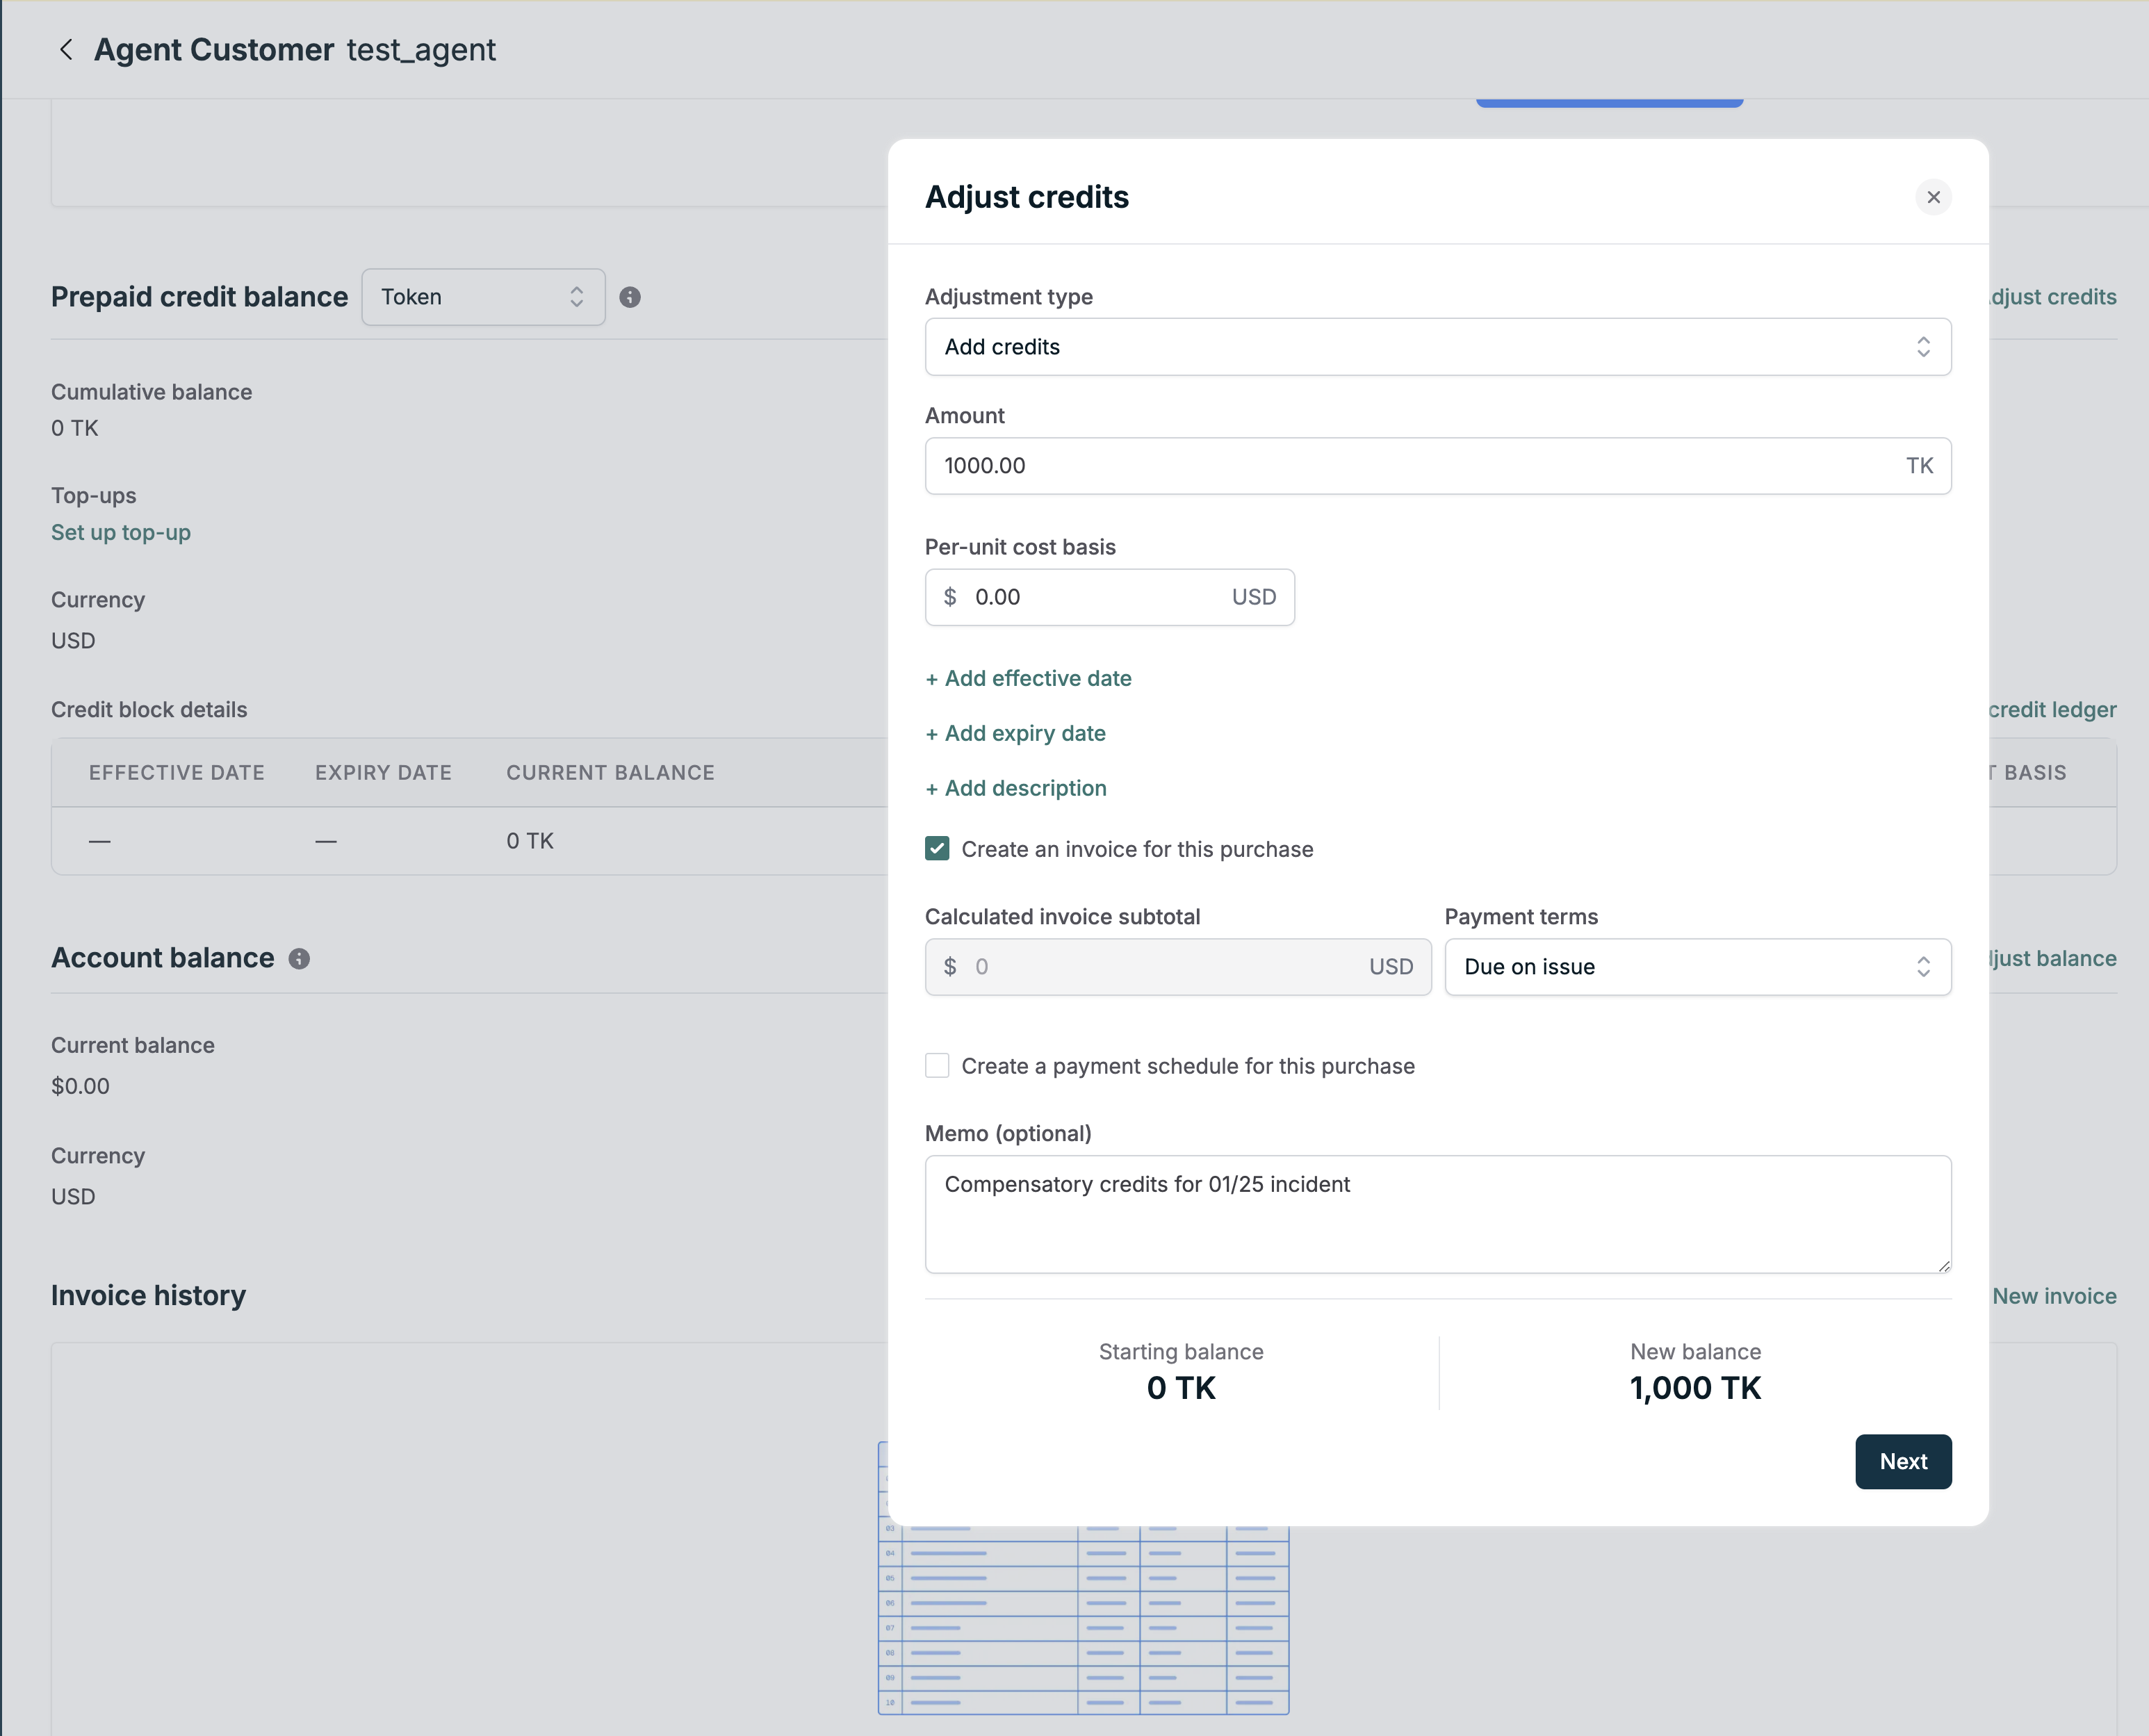
In the event that a customer has an issue with their credit balance or you want to one-off provide credits to a customer, you can manually grant additional tokens by using the create ledger entry endpoint and use
the description field to explain the nature of the grant. In this event, you should create the grant with a cost basis of $0 to avoid any additional charges to the customer.
Similarly, you can grant credits directly through the Orb webapp by navigating to the customer’s page and clicking the “Adjust credits” button, being sure that you are adjusting credits in the token currency: