> ## Documentation Index
> Fetch the complete documentation index at: https://docs.withorb.com/llms.txt
> Use this file to discover all available pages before exploring further.
# Getting started: NetSuite Integration setup
To setup the Orb NetSuite integration, you’ll need to:
1. **Setup and configure NetSuite.** This ensures the integration is compatible with your NetSuite configuration.
2. **Install the Orb NetSuite Integration bundle.** This deploys the custom records and scripts to enable the integration behaviors in NetSuite.
3. **Generate your NetSuite connection credentials.** You’ll use these inputs to authenticate the Orb and NetSuite connection.
4. **Create an integration user.** This is the login the integration uses to access NetSuite.
5. **Configure the integration in Orb.** This is where you define what and how Orb syncs to NetSuite.
6. **(Optional) Manually configure custom records required for credit drawdown.** If you use prepaid credits in Orb, additional setup is required to enable syncing credits and recognizing item-specific revenue in NetSuite.
# Step 1: Setup and configure NetSuite
You will need to do this with a user with **Administrator access** to your NetSuite account.
## Align timezones
*Optional: this setting is strongly recommended, but not functionally required for the integration.*
Orb and NetSuite should be configured to the same timezone to ensure transaction timestamps align correctly during sync. Mismatches can cause invoices to post to the wrong accounting period, and make debugging more difficult.
Finding your timezone settings:
* NetSuite: **Setup > Company > Company Information**
* Orb: **Settings > General > Account time zone** (contact Orb Support to change this)
If new to Orb, set your timezone to be the same as NetSuite’s. Note that timezone changes are not retroactive — existing transaction timestamps will not be updated. If you don't have an existing preference, we recommend UTC (UTC+00:00) for both systems.
## Enable auto-generated numbers for customer creation
*Optional: this setting is strongly recommended, but not functionally required for the integration.*
Orb relies on NetSuite generating a unique numeric ID for each customer record to ensure syncs are idempotent. Auto-Generated Numbers must be enabled for the Customer record type in NetSuite to generate a unique numeric ID. Otherwise, NetSuite will default to the customer name as the customer ID, which can cause the sync to fail.
**Setup > Company > Auto-Generated Numbers.** Check **enable** for Customer entity type.
Note: this is a [NetSuite-only sequential record identifier](https://docs.oracle.com/en/cloud/saas/netsuite/ns-online-help/section_N252198.html), and does NOT modify any other customer identifiers you may already reference in NetSuite. It is also separate from the Orb customer ID, and is usually distinct from the external customer ID.
## Enable features
Ensure the following features are enabled or selected. **Setup** > **Company** > **Enable Features**.
| **Subtab** | **Feature** | **What it does** | **Required?** |
| :----------- | :--------------------------------------------------------------------------------------------------------------------------------------------------------------- | :------------------------------------------------------------------------------------------------------------------------------------------------------------------------------------------------------------------------------------------------------------------------------------------------------------------------------------------------------------------------------------------------------------------------------------------- | :-------------------------------------------------------------------------------------- |
| Company | - Multiple Currencies (if billing in more than one currency) **checked**
- File cabinet **checked**
| - Enables billing and transaction processing in more than one currency. Required if Orb is invoicing customers in multiple currencies.
- Provides access to NetSuite's internal file storage.
| - Yes, if billing in multiple currencies
- Yes
|
| Accounting | - Accounting **checked**
- Advanced Revenue Management (ARM) – Essentials **checked**
- Rule-Based Recognition Treatment **checked**
| - Enables core accounting features including invoices, credit memos, and GL posting.
- Enables revenue arrangements, recognition schedules, and deferred revenue management for Orb to handle revenue correctly.
- Applies the correct revenue recognition rule to each transaction line based on configurable criteria. Required for multi-element arrangements with mixed recognition treatments (like usage).
| |
| Tax | *If calculating tax in Orb* - Advanced taxes **checked**
- SuiteTax **unchecked**
| - Unlocks per-line tax calculation, multi-jurisdiction tax codes, and the tax infrastructure required for Orb's tax override to function correctly.
- NetSuite's newer tax engine — incompatible with Orb's tax override implementation, and other existing tax modules.
| - Yes, if calculating tax in Orb
- Yes, if calculating tax in Orb
|
| Transactions | - Sales Orders **checked**
- Return Authorizations **checked**
- Advanced Shipping **checked**
| - Enables the sales order transaction type, which Orb uses to handle initial sale / invoice generation.
- Enables the return authorization (RMA) transaction type, which Orb uses to handle invoice reversals and credit memo generation.
- Enables unchecking fulfillment workflows on Items.
| - Yes, if using sales orders
- Yes, if using RMAs
- Yes
|
| SuiteCloud | - Custom records **checked**
- OAuth 2.0 **checked**
- Service SuiteScript **checked**
- REST Web Services **checked**
| - Enables creation and use of custom data structures in NetSuite.
- Enables token-based authentication for external systems connecting to NetSuite.
- Enables server-side scripts to run within NetSuite.
- Enables NetSuite's native REST API endpoints for external integrations.
| |
## Accounting preferences
Ensure the following accounting preferences are selected. **Setup** > **Accounting** > **Accounting** **Preferences**.
| **Subtab** | **Feature** | **What it does** | **Required?** |
| :--------------- | :---------------------------------------------------------------------------------------------------------------------------------------------------------------------------------------------------------------------------------------------------------------------------------------------------------------------------------------------------------------------------------------------------------------------------- | :-------------------------------------------------------------------------------------------------------------------------------------------------------------------------------------------------------------------------------------------------------------------------------------------------- | :------------------------------------------------------ |
| General | - Require Invoice Approval When Revenue Plans Are Created On Billing **unchecked**
| - If checked, this approval step blocks Orb from completing the sync.
| |
| Order Management | - Default Sales Order Status = **Pending Fulfillment\***
- Default Return Authorization Status = **Pending Receipt\***
- Invoice in Advance of Fulfillment **checked**
- Bill in Advance of Receipt **checked**
*\* If your NetSuite admin has configured any approval workflows, keep in mind that transactions will not be created until after the record is approved for billing.* | - Bypasses approval workflows that could block Orb from completing the sync.
- Bypasses approval workflows that could block Orb from completing the sync.
- Ensures invoice creation is not blocked on fulfillment.
- Ensures returns are not blocked on receipt.
| |
## Revenue Field Mapping
Orb syncs line-level service period start and end dates to custom transaction line fields installed via the bundle. This ensures the values are reliably preserved during transaction creation and transformation in NetSuite. To enable proper revenue recognition set up by your administrator, map these custom fields to NetSuite’s native revenue recognition start and end date fields. **Setup** > **Accounting** > **Revenue Field Mapping** > **New**.
Ensure revenue recognition field mappings have been created to reference the custom service start and end dates synced from Orb.
* Source record type = Transaction Line
* Automatically update target field value = T
| Source field | Target field |
| ---------------------- | ------------------- |
| Orb Rev Rec Start Date | Start Date |
| Orb Rev Rec Start Date | Forecast Start Date |
| Orb Rev Rec End Date | End Date |
| Orb Rev Rec End Date | Forecast End Date |
If you're also syncing [fixed term subscriptions to NetSuite as a Sales Order](https://docs.withorb.com/integrations-and-exports/netsuite-how-its-synced#if-you-choose-to-sync-transactions-for-fixed-term-subscriptions-to-a-single-sales-order-with-related-sales-invoices-in-netsuite%E2%80%A6), you'll also need to configure:
* Source record type = Transaction Line
* Transaction type = Sales Order
* Automatically update target field value = T
| Source field | Target field |
| :--------------------------- | :--------------------------- |
| Orb Order Line Timing (Line) | Orb Order Line Timing (Line) |
## Revenue Recognition Treatments
If you're also syncing [fixed term subscriptions to NetSuite as a Sales Order](https://docs.withorb.com/integrations-and-exports/netsuite-how-its-synced#if-you-choose-to-sync-transactions-for-fixed-term-subscriptions-to-a-single-sales-order-with-related-sales-invoices-in-netsuite%E2%80%A6), you'll also need to configure the following under **Setup > Accounting > Revenue Recognition Treatments**.
* Name = Allocation Type Override
* Description = Overrides the allocation type to "Exclude"
* Allocation Type = Exclude
## Recognition Treatment Rules
If you're also syncing [fixed term subscriptions to NetSuite as a Sales Order](https://docs.withorb.com/integrations-and-exports/netsuite-how-its-synced#if-you-choose-to-sync-transactions-for-fixed-term-subscriptions-to-a-single-sales-order-with-related-sales-invoices-in-netsuite%E2%80%A6), you'll also need to configure the following under **Setup > Accounting > Recognition Treatment Rules.**
* Rule Name = Orb Append Allocation Type Override
* Recognition Treatment = Allocation Type Override
* Criteria, Field = Orb Order Line Timing
* Criteria, Value = Append
## Item configuration
Orb supports syncing Non-Inventory and Service type item records.
For each Item in NetSuite that corresponds to an item synced from Orb, ensure the following fields are set. **Lists > Accounting > Items**.
| **Subtab** | **Field** | **What it does** | **Required?** |
| :------------------ | :--------------------------------------------------------------------------------------------------------------------------------------------- | :---------------------------------------------------------------------------------------------------------------------------------------------------- | :----------------------------------------------- |
| Primary information | - Includes children (**unchecked**)
| - Best practice to ensure specific subsidiary visibility.
| |
| Accounting | *If sales tax is calculated in Orb*. - Tax schedule = **Taxable**
| - Tells NetSuite to apply tax to this line item, which allows Orb to write the pre-calculated tax amount using the tax override code.
| - Yes, if calculating tax in Orb
|
| Preferences | *Ensure Advanced Shipping feature is enabled\** - Can be Fulfilled/Received (**unchecked**)
*\*Non-inventory items only* | - Removes the fulfillment requirement from this line item, which can block record creation.
| - No, but strongly recommended
|
To **bulk update item** configurations in NetSuite, use the built-in CSV import tool at Setup > Import/Export > Import CSV Records. This allows you to update fields across multiple item records simultaneously without editing them one by one.
## Tax configuration (US support only)
Syncing tax is only supported for transactions in US-jurisdictions. International support is coming soon.
If you bill and collect tax on invoices in Orb, configure NetSuite to receive tax amounts for accurate reporting in NetSuite.
**Our approach**
Orb calculates tax upstream and passes pre-calculated tax information to NetSuite, rather than relying on NetSuite's tax engine be responsible. To do this reliably, we use a two-step process:
1. **Record creation** — Orb creates the transaction with `taxrate1` set to 0, establishing the tax placeholder on the record
2. **Tax application** — Orb performs a subsequent edit to the record, overwriting the correct Orb-calculated tax amounts per line
This two-step approach ensures that Orb's tax values are applied precisely and are not overwritten by NetSuite's internal recalculation engine — giving you a clean, authoritative record of exactly what was calculated and billed in Orb.
**Why we use** `taxrate `**instead of an amount field**
In NetSuite, `record.setSublistValue` truncates `tax1amt` to an integer when given a non-integer value. Since invoicing precision tax values are the norm, Orb takes the approach of deriving the final tax amount in NetSuite using `taxrate1` instead of writing to the `tax1amt `field directly.
In these cases, this is why you might see a modified `taxrate1` value sent from Orb during record creation.
For sales order flows, we intentionally suppress estimated tax on the sales order and ensure the final invoice carries the correct tax/GL impact with no revenue impact or duplication.
**Step 1: Enable per-line taxes on transactions (US jurisdiction)**
The “per-line taxes on transactions” setting tells NetSuite to calculate and display tax at each transaction line instead of only at the header/body level. For Orb, this is required so our tax override can populate line-level tax behavior correctly rather than collapsing tax to the transaction total.
To enable it, **Setup > Accounting > Tax Preferences**, open United States and check the “per-line taxes on transactions” option. If you don’t see this field, ensure Advanced Taxes is enabled.
**Step 2: Create an Orb tax override code (US jurisdiction)**
Orb uses this code together with NetSuite’s line-level `tax1rate`behavior so that NetSuite respects the tax information Orb sends, instead of recalculating tax based on its own rates.
1. Create a new tax code for Orb under **Setup** > **Accounting** > **Taxes** > **Tax Codes** > **New**.
1. Name it “Orb Tax Override”, (or similar).
2. Set the tax rate to 0%.
3. Choose the appropriate tax type and tax agency for your environment.
4. Ensure it is in the correct subsidiary.
2. We strongly do NOT recommend configuring any other optional fields in this override code – this adds additional validation logic for NetSuite’s tax engine, that pollutes the passthrough functionality.
3. **Save**.
# Step 2: Install the Orb NetSuite Integration bundle
1. Navigate to **Customization** > **SuiteBundler** > **Search & Install Bundles**.
2. Search **Orb NetSuite Integration Bundle**. ID: `597717`. (Ask Orb to approve bundle access before installation.)
3. Select the bundle from the results and click **Install**.
4. Wait for the installation to complete. This may take a few minutes.
The bundle will install SuiteScripts and custom objects (fields, records, roles, etc) into your NetSuite account.
## **What's in the bundle**
* 14 transaction line custom fields + 6 body fields + 1 entity field
* 1 custom error record type
* Orb Integration Role (includes \~50 required permissions for minimum integration functionality)
* RESTlet + bundle installation script
These components are locked – you cannot edit/view field definitions.
| Custom Fields | Script ID | Purpose |
| --------------------------- | ------------------------------------ | ---------------------------------------------------------------------------------------------------------------------------------------------------------------- |
| **Entity fields** | | |
| Orb customer ID | `custentity_orb_external_id` | Represents the Orb external ID for the customer that triggered the creation of this NetSuite customer. |
| **Transaction body fields** | | |
| Orb invoice number | `custbody_orb_invoice_number` | Represents the Orb invoice number that triggered the creation of this NetSuite record. |
| Orb credit note number | `custbody_orb_creditnote_number` | Represents the Orb credit note number that triggered the creation of this NetSuite record. |
| Orb credit block ID | `custbody_orb_credit_block_id` | Represents the credit block ID that triggered the creation of this NetSuite record. Only applicable for recognizing prepaid credit drawdown. |
| Orb originating invoice | `custbody_orb_originating_inv` | Represents the purchase invoice tied to the creation of this NetSuite record. Only applicable for recognizing prepaid credit drawdown. |
| Orb prepaid credit type | `custbody_orb_prepaid_credit_type` | Represents whether this record corresponds to an Allocation or Manual credit block in Orb. Only applicable for recognizing prepaid credit drawdown. |
| Orb subscription ID | `custbody_orb_subscription_id` | Represents the Orb subscription that triggered the creation of this NetSuite record. Only applicable for Subscription-driven sales order mapping configurations. |
| **Transaction line fields** | | |
| Orb Rev Rec Start Date | `custcol_orb_rev_rec_start_date` | Represents the line item service period start date. Mapped to the revenue element start date via revenue field mapping. |
| Orb Rev Rec End Date | `custcol_orb_rev_rec_end_date` | Represents the line item service period end date. Mapped to the revenue element end date via revenue field mapping. |
| Orb List Rate | `custcol_orb_list_rate` | Represents unadjusted subtotal amount before adjustments have been applied. |
| Orb Discount Percentage | `custcol_orb_discount_percentage` | Represents the percentage discount adjustment configured in Orb. |
| Orb Discount Amount | `custcol_orb_discount_amount` | Represents the amount discount adjustment configured in Orb. |
| Orb Discounted Rate | `custcol_orb_discounted_rate` | This is a derived value calculated outside of Orb. Represents the per-unit adjusted rate. |
| Orb Discounted Amount | `custcol_orb_discounted_amount` | This is a derived value calculated outside of Orb. Represents the per-line adjusted subtotal. |
| Orb Coupon Applied | `custcol_orb_coupon_applied` | Represents the coupon amount discount adjustment configured in Orb. |
| Orb Maximum Adjustment | `custcol_orb_max_adjust` | Represents the subtotal delta above the maximum adjustment configured in Orb. |
| Orb Minimum Adjustment | `custcol_orb_min_adjust` | Represents the minimum adjustment configured in Orb. |
| Orb Credit Block ID | `custcol_orb_credit_block_id` | Represents the credit block ID that triggered the creation of this NetSuite customer deposit. Only applicable for recognizing prepaid credit drawdown. |
| Orb Prepaid Credit Type | `custcol_orb_prepaid_credit_type` | Represents whether this record corresponds to an allocation or manual purchase credit block in Orb. Only applicable for recognizing prepaid credit drawdown. |
| Orb Credit Expiration Date | `custcol_orb_credit_expiration_date` | Represents the expiration date configured on the corresponding credit block in Orb, if applicable. Only applicable for recognizing prepaid credit drawdown. |
| Orb Line Item ID | `custcol_orb_line_item_id` | Represents the corresponding Orb line item ID to help with debugging. |
# Step 3: **Generate your NetSuite connection credentials**
You will need to do this with a user with **Administrator access** to your NetSuite account.
### **1. Verify the script deployment from the bundle**
1. Navigate to **Customization** > **Scripting** > **Script Deployments**.
2. Find the RESTlet deployment installed by the bundle and click on ‘View’.
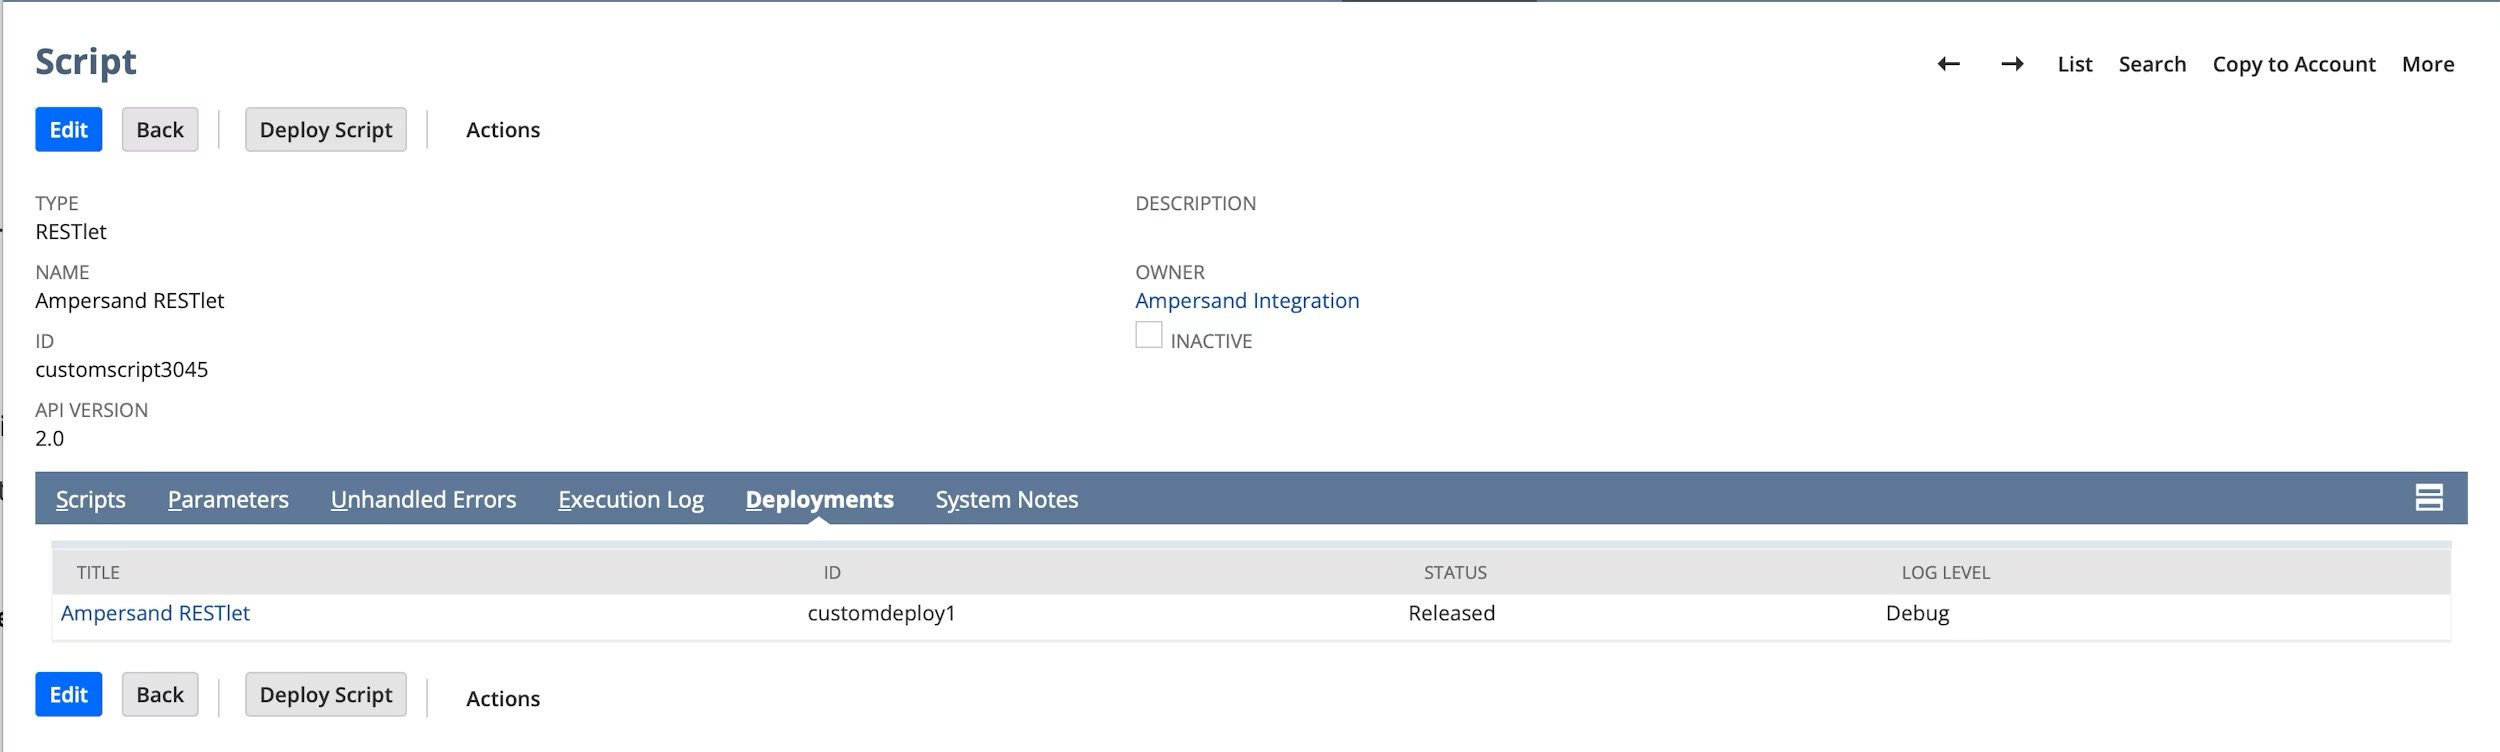 3. Verify the deployment **Status** is **Released**.
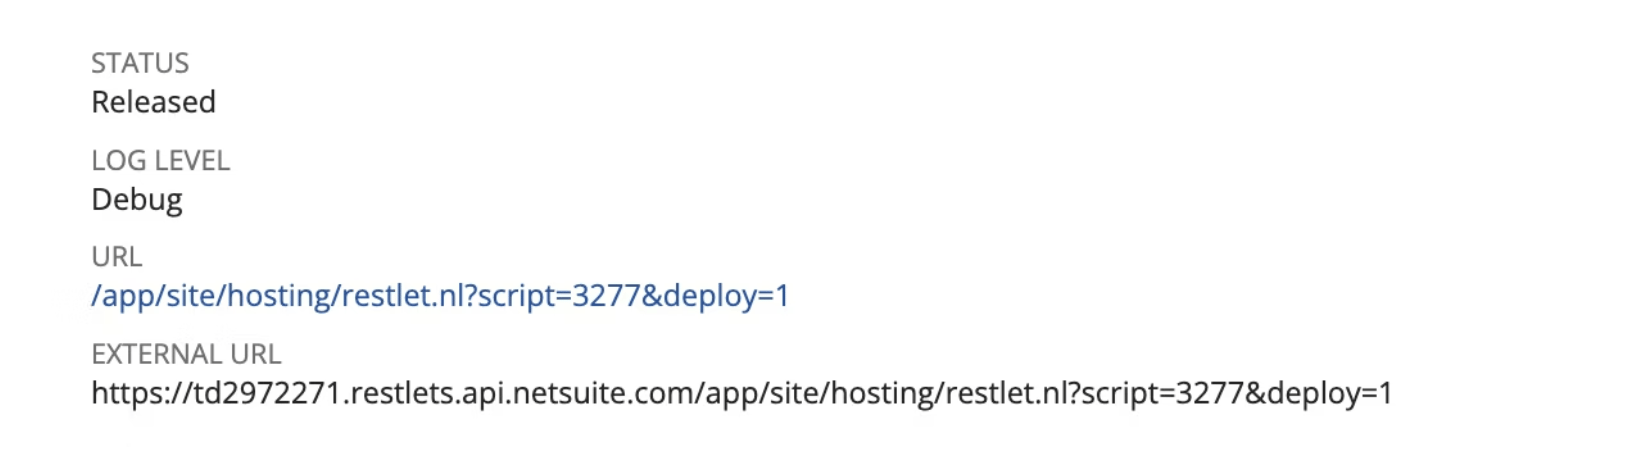
4. Click on the name of the script, then note the **URL** — you will need it for the installation step.
3. Verify the deployment **Status** is **Released**.
4. Click on the name of the script, then note the **URL** — you will need it for the installation step.
 ### 2. Create an integration record
The integration record identifies the external application that will connect to your NetSuite account.
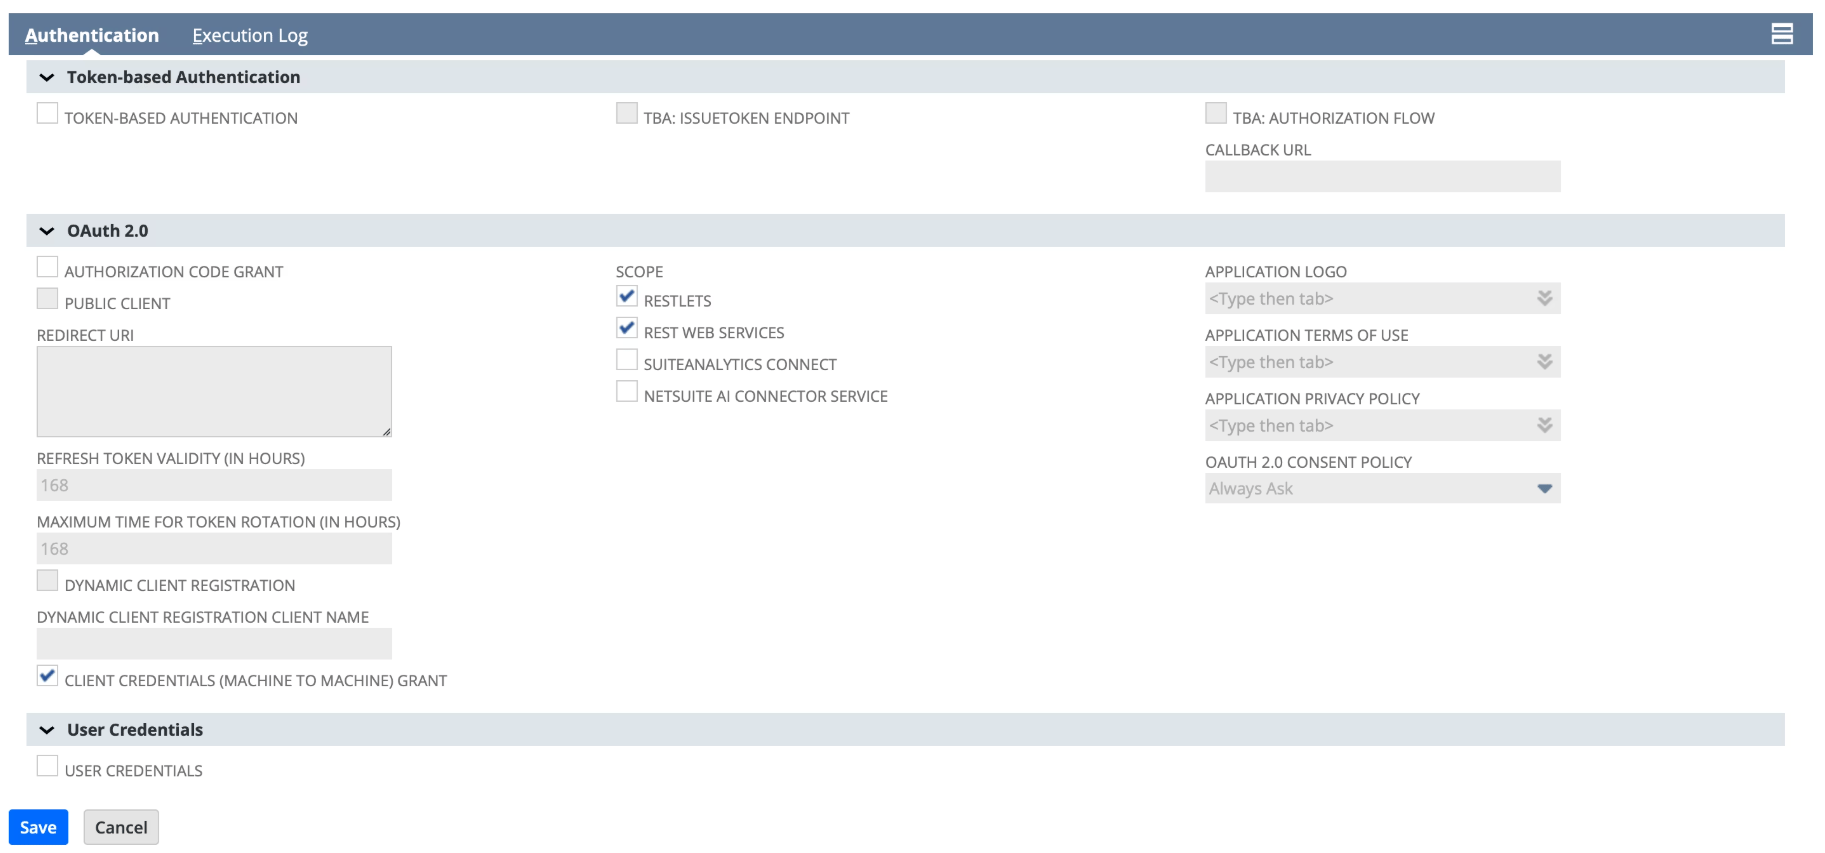
1. Navigate to **Setup** > **Integration** > **Manage Integrations** > **New**.
2. Enter a **Name** for the integration (e.g. “Orb NetSuite Integration”).
3. Under the **Token-based Authentication** section:
* Uncheck **TBA: Authorization Flow**
* Uncheck **Token-Based Authentication**
4. Under the **OAuth 2.0** section:
* Uncheck **Authorization Code Grant**
* Check **Client Credentials (Machine to Machine) Grant**
5. Under **Scope**, check the following:
* **RESTlets**
* **REST Web Services**
6. Click **Save**.
### 2. Create an integration record
The integration record identifies the external application that will connect to your NetSuite account.
1. Navigate to **Setup** > **Integration** > **Manage Integrations** > **New**.
2. Enter a **Name** for the integration (e.g. “Orb NetSuite Integration”).
3. Under the **Token-based Authentication** section:
* Uncheck **TBA: Authorization Flow**
* Uncheck **Token-Based Authentication**
4. Under the **OAuth 2.0** section:
* Uncheck **Authorization Code Grant**
* Check **Client Credentials (Machine to Machine) Grant**
5. Under **Scope**, check the following:
* **RESTlets**
* **REST Web Services**
6. Click **Save**.
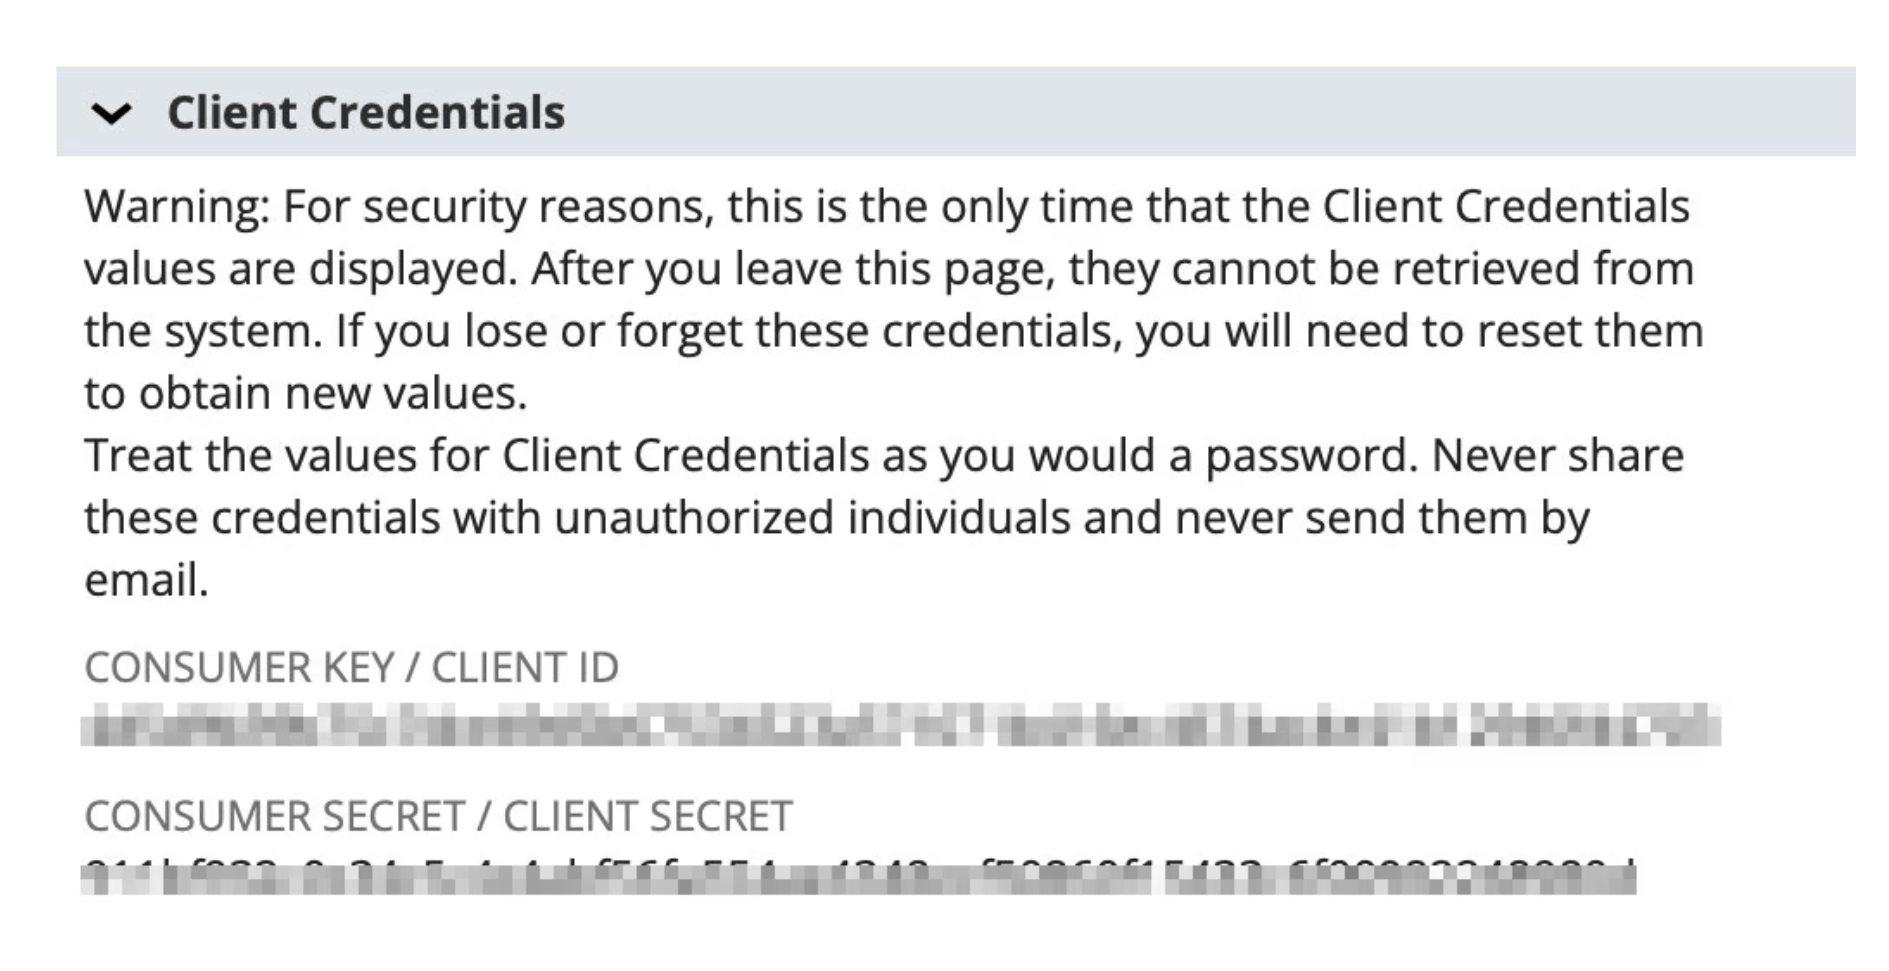
 7. After saving, NetSuite displays the **Consumer Key / Client ID** under the **Client Credentials** section. Copy this value and store it securely — it is shown only once and cannot be retrieved later.
 ### **3. Generate a certificate key pair**
In this step you’ll use your computer’s terminal to create two files: a private key and a self-signed certificate. This is a one-time operation — if anything goes wrong, you can delete the files and start over. Before you begin, you need **OpenSSL** available in your terminal. macOS and most Linux distributions include it by default. On **Windows**, use **Git Bash** (bundled with [**Git for Windows**](https://gitforwindows.org/), which includes OpenSSL), **WSL**, or install OpenSSL and ensure it is on your `PATH`.
**1. Create a folder and open a terminal in it**
Create a new folder anywhere you’ll remember — your Desktop works fine. For example, create one called `netsuite-keys`. Then open a terminal *inside that folder* so the files you generate end up there:
* **macOS**: In **Finder**, right-click the folder and choose **New Terminal at Folder**. (If you don’t see this option, enable it under **System Settings** > **Keyboard** > **Keyboard Shortcuts** > **Services** > **Files and Folders** > **New Terminal at Folder**.)
* **Windows**: In **File Explorer**, right-click inside the folder and choose **Open in Terminal** or **Open Git Bash here**.
* **Any OS (fallback)**: Open your terminal app, type `cd `(with a trailing space), drag the folder from your file browser onto the terminal window, and press **Enter**.
**2. Run the OpenSSL commands**
Copy each command below, paste it into the terminal right after the prompt (`%` on macOS, `$` on Linux/Git Bash, `PS>` on PowerShell), and press **Enter**. Run them one at a time.
```text theme={null}
openssl ecparam -name prime256v1 -genkey -noout -out private-key.pem
```
```text theme={null}
openssl req -new -x509 -key private-key.pem -out cert.pem -days 730
```
The second command will prompt you for certificate details (country, organization name, email, etc.). **Press Enter at every prompt to accept the defaults** — these values are not used by the integration, so it doesn’t matter what they are.
**3. Confirm the two files were created**
If the commands succeeded, your folder now contains two files:
* `private-key.pem` — Your private key. You will base64-encode this and share it when installing the integration.
* `cert.pem` — Your public certificate. You will upload this to NetSuite.
Open the folder in **Finder** (macOS) or **File Explorer** (Windows) to confirm both files are there. If you can’t see them, search your computer for `cert.pem` — the files were created in whichever folder your terminal was open in.
If anything looks wrong — missing files, error messages, accidentally hit Enter too many times — just delete the files and run the commands again. The keys aren’t registered anywhere until you upload `cert.pem` to NetSuite, so there’s no risk in starting over.
**4. Base64-encode the private key**
Run the command below to print a base64-encoded version of your private key directly in the terminal. Use the version that matches your environment:
**macOS (Terminal)**
```shellscript theme={null}
base64 -i private-key.pem
```
**Linux, Git Bash, or WSL**
```shellscript theme={null}
base64 -w 0 private-key.pem
```
**Windows (PowerShell)**
From the directory that contains `private-key.pem`:
```powershell theme={null}
[Convert]::ToBase64String([IO.File]::ReadAllBytes((Resolve-Path 'private-key.pem')))
```
Copy the encoded string (a long single line, e.g. starting with `LS0tLS1CRUdJTiBFQyBQUklWQVRFIEtFWS0tLS0t...`). It will be required during the installation process.
# Step 4: Create an integration user and authorize a M2M connection
**Create an integration user**
We strongly recommend creating a dedicated NetSuite integration user for the Orb integration, rather than connecting with a personal administrator account. This keeps access predictable over time, and makes it easier to audit which changes are driven by the integration.
1. **Create a new NetSuite user** intended only for the Orb integration (for example, [orb-integration@yourcompany.com](mailto:orb-integration@yourcompany.com)).
2. **Assign an appropriate role** to this user:
1. For fastest setup, you can assign the pre-defined Orb Integration Role that ships with the Orb NetSuite Integration bundle (recommended).
1. Navigate to **Setup** > **Users/Roles** > **User Management** > **Employees** (or Lists > Employees).
2. Find and edit the employee record you want the integration to run as. This can be an existing user or a dedicated integration user.
3. Go to the **Access** tab.
4. In the Roles subtab, click **Add**.
5. Select the custom role from the dropdown.
6. Click **Save**.
2. If your security team requires stricter scoping, you can instead create a custom role based on NetSuite’s permissions model, using our Required permissions section as a baseline.
Use this user to authorize the Orb → NetSuite connection during integration setup. Any future permission changes can then be made by editing this role, without touching individual employee accounts.
**Create a machine-to-machine certificate mapping**
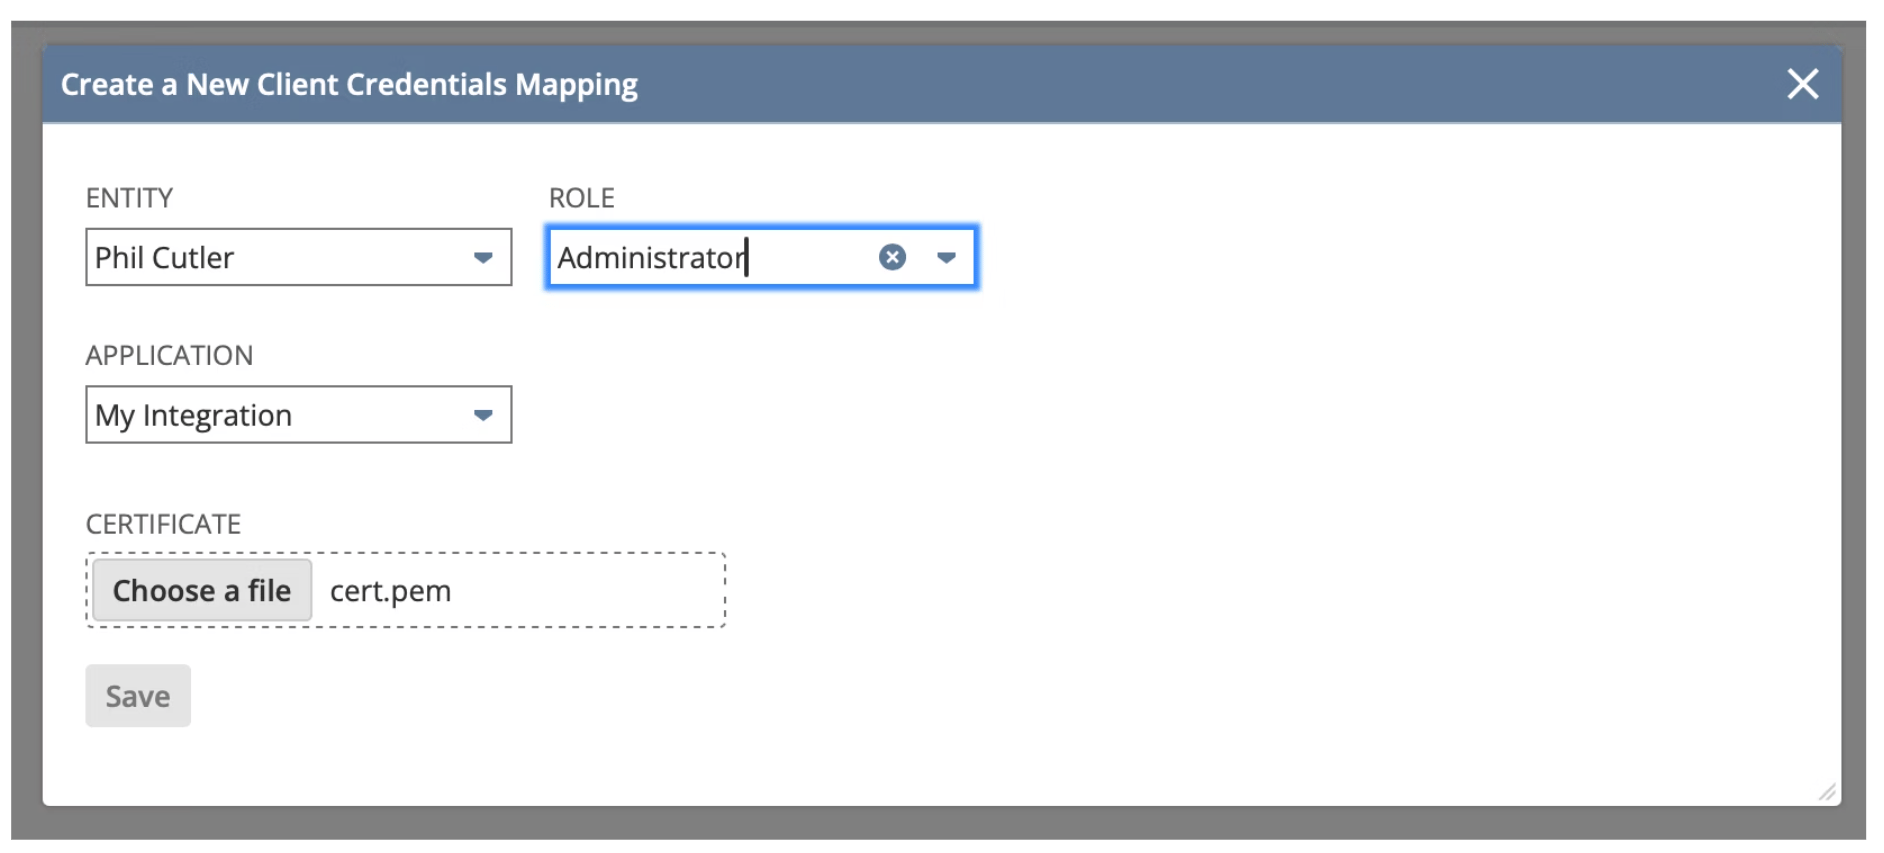
1. Navigate to **Setup** > **Integration** > **OAuth 2.0 Client Credentials (M2M) Setup**.
2. Click **Create New.**
3. Configure the following fields:
1. **Entity**: Select the integration user (from the previous step)
2. **Role**: Select the custom role that the bundle installed. Please note that the role must include the **Log in Using OAuth 2.0 Access Tokens** permission.
3. **Application**: Select the integration record you created.
4. **Certificate**: Upload the `cert.pem` file you generated.
4. Click **Save**.
### **3. Generate a certificate key pair**
In this step you’ll use your computer’s terminal to create two files: a private key and a self-signed certificate. This is a one-time operation — if anything goes wrong, you can delete the files and start over. Before you begin, you need **OpenSSL** available in your terminal. macOS and most Linux distributions include it by default. On **Windows**, use **Git Bash** (bundled with [**Git for Windows**](https://gitforwindows.org/), which includes OpenSSL), **WSL**, or install OpenSSL and ensure it is on your `PATH`.
**1. Create a folder and open a terminal in it**
Create a new folder anywhere you’ll remember — your Desktop works fine. For example, create one called `netsuite-keys`. Then open a terminal *inside that folder* so the files you generate end up there:
* **macOS**: In **Finder**, right-click the folder and choose **New Terminal at Folder**. (If you don’t see this option, enable it under **System Settings** > **Keyboard** > **Keyboard Shortcuts** > **Services** > **Files and Folders** > **New Terminal at Folder**.)
* **Windows**: In **File Explorer**, right-click inside the folder and choose **Open in Terminal** or **Open Git Bash here**.
* **Any OS (fallback)**: Open your terminal app, type `cd `(with a trailing space), drag the folder from your file browser onto the terminal window, and press **Enter**.
**2. Run the OpenSSL commands**
Copy each command below, paste it into the terminal right after the prompt (`%` on macOS, `$` on Linux/Git Bash, `PS>` on PowerShell), and press **Enter**. Run them one at a time.
```text theme={null}
openssl ecparam -name prime256v1 -genkey -noout -out private-key.pem
```
```text theme={null}
openssl req -new -x509 -key private-key.pem -out cert.pem -days 730
```
The second command will prompt you for certificate details (country, organization name, email, etc.). **Press Enter at every prompt to accept the defaults** — these values are not used by the integration, so it doesn’t matter what they are.
**3. Confirm the two files were created**
If the commands succeeded, your folder now contains two files:
* `private-key.pem` — Your private key. You will base64-encode this and share it when installing the integration.
* `cert.pem` — Your public certificate. You will upload this to NetSuite.
Open the folder in **Finder** (macOS) or **File Explorer** (Windows) to confirm both files are there. If you can’t see them, search your computer for `cert.pem` — the files were created in whichever folder your terminal was open in.
If anything looks wrong — missing files, error messages, accidentally hit Enter too many times — just delete the files and run the commands again. The keys aren’t registered anywhere until you upload `cert.pem` to NetSuite, so there’s no risk in starting over.
**4. Base64-encode the private key**
Run the command below to print a base64-encoded version of your private key directly in the terminal. Use the version that matches your environment:
**macOS (Terminal)**
```shellscript theme={null}
base64 -i private-key.pem
```
**Linux, Git Bash, or WSL**
```shellscript theme={null}
base64 -w 0 private-key.pem
```
**Windows (PowerShell)**
From the directory that contains `private-key.pem`:
```powershell theme={null}
[Convert]::ToBase64String([IO.File]::ReadAllBytes((Resolve-Path 'private-key.pem')))
```
Copy the encoded string (a long single line, e.g. starting with `LS0tLS1CRUdJTiBFQyBQUklWQVRFIEtFWS0tLS0t...`). It will be required during the installation process.
# Step 4: Create an integration user and authorize a M2M connection
**Create an integration user**
We strongly recommend creating a dedicated NetSuite integration user for the Orb integration, rather than connecting with a personal administrator account. This keeps access predictable over time, and makes it easier to audit which changes are driven by the integration.
1. **Create a new NetSuite user** intended only for the Orb integration (for example, [orb-integration@yourcompany.com](mailto:orb-integration@yourcompany.com)).
2. **Assign an appropriate role** to this user:
1. For fastest setup, you can assign the pre-defined Orb Integration Role that ships with the Orb NetSuite Integration bundle (recommended).
1. Navigate to **Setup** > **Users/Roles** > **User Management** > **Employees** (or Lists > Employees).
2. Find and edit the employee record you want the integration to run as. This can be an existing user or a dedicated integration user.
3. Go to the **Access** tab.
4. In the Roles subtab, click **Add**.
5. Select the custom role from the dropdown.
6. Click **Save**.
2. If your security team requires stricter scoping, you can instead create a custom role based on NetSuite’s permissions model, using our Required permissions section as a baseline.
Use this user to authorize the Orb → NetSuite connection during integration setup. Any future permission changes can then be made by editing this role, without touching individual employee accounts.
**Create a machine-to-machine certificate mapping**
1. Navigate to **Setup** > **Integration** > **OAuth 2.0 Client Credentials (M2M) Setup**.
2. Click **Create New.**
3. Configure the following fields:
1. **Entity**: Select the integration user (from the previous step)
2. **Role**: Select the custom role that the bundle installed. Please note that the role must include the **Log in Using OAuth 2.0 Access Tokens** permission.
3. **Application**: Select the integration record you created.
4. **Certificate**: Upload the `cert.pem` file you generated.
4. Click **Save**.
 5. Copy the **Certificate ID** from the list — you will need this value when installing the integration.
 Check that the `Valid Until` date for the certificate is two years in the future. NetSuite allows a maximum validity of 730 days.
# Step 5: Configure the integration in Orb
Once your NetSuite bundle is installed and the dedicated integration user is ready, you’ll complete the connection from within Orb. This step links your Orb account to your NetSuite environment using that integration user and enables the asynchronous, one‑way sync from Orb → NetSuite.
## 1. Navigate to the NetSuite integration in Orb.
1. Go to [Settings > Integrations > Accounting](https://app.withorb.com/settings?tab=integrations).
## 2. Start the connection flow.
1. Click **Connect**.
2. When installing the integration, you will be prompted for a number of inputs:
Check that the `Valid Until` date for the certificate is two years in the future. NetSuite allows a maximum validity of 730 days.
# Step 5: Configure the integration in Orb
Once your NetSuite bundle is installed and the dedicated integration user is ready, you’ll complete the connection from within Orb. This step links your Orb account to your NetSuite environment using that integration user and enables the asynchronous, one‑way sync from Orb → NetSuite.
## 1. Navigate to the NetSuite integration in Orb.
1. Go to [Settings > Integrations > Accounting](https://app.withorb.com/settings?tab=integrations).
## 2. Start the connection flow.
1. Click **Connect**.
2. When installing the integration, you will be prompted for a number of inputs:
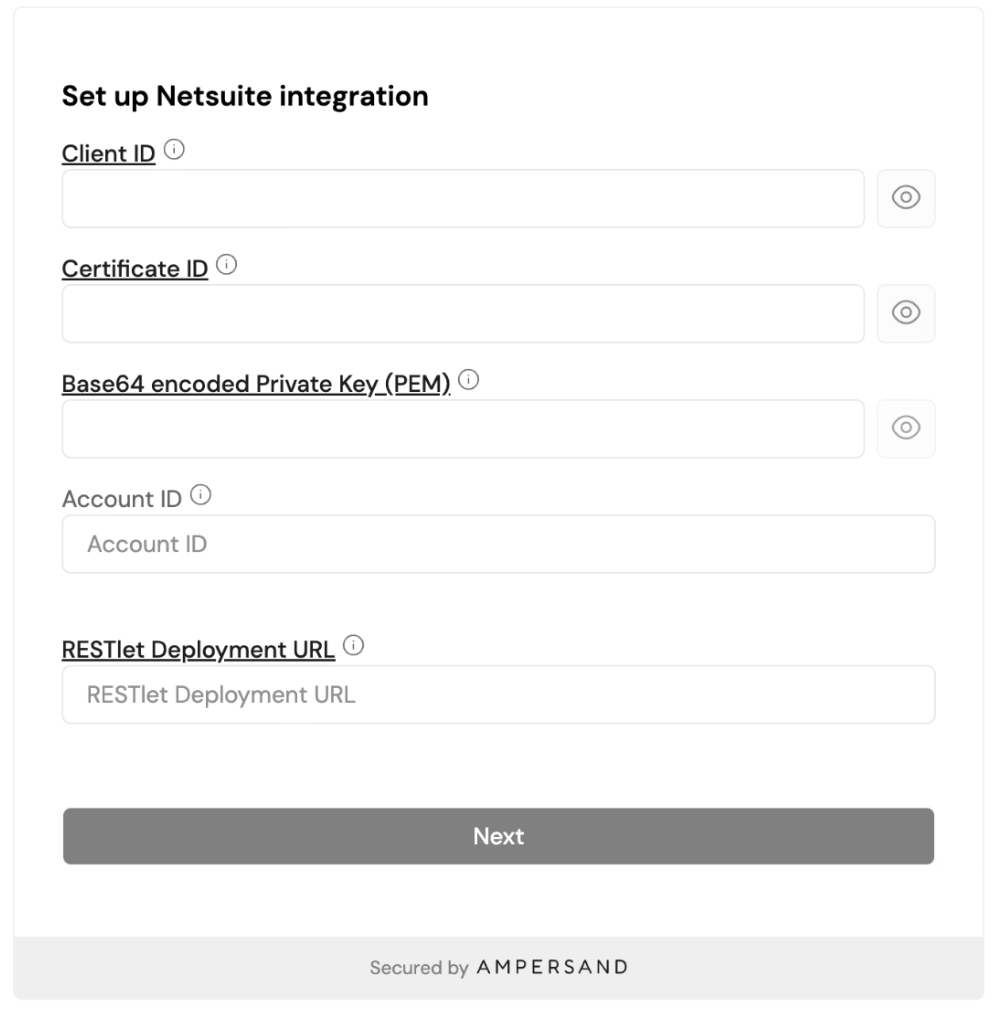 Here is where to find each value:
| **Input** | **Where to find it** |
| :------------------------- | :---------------------------------------------------------------------------------------------------------------------------- |
| **Client ID** | The Consumer Key saved. |
| **Certificate ID** | The Certificate ID saved. |
| **Private Key** | Base64-encoded contents of `private-key.pem`. |
| **Account ID** | Your NetSuite URL (e.g. `https://1234567.app.netsuite.com` → Account ID is `1234567`). |
| **RESTlet Deployment URL** | This is printed out in the Deployments tab of the script, and looks like `/app/site/hosting/restlet.nl?script=3045&deploy=1`. |
**Sandbox accounts**: If you are connecting a sandbox account, your Account ID may contain an underscore and suffix (e.g. `1234567_SB1`). Provide it exactly as shown in your NetSuite URL or Company Information page.
3. Select and accept all permissions.
## 3. Configure sync behavior and mappings.
1. After establishing a successful connection, define how Orb maps to your NetSuite account.
1. **Subsidiary** → select which entity transactions are created in.
2. **Location** → select a value if this segment is required on a NetSuite transaction. Else, the record will fail to sync.
2. Select the **tax override** **code** configured above, if syncing taxes applied to invoices issued from Orb.
3. Select a **bank account** per currency to determine where payments received in Orb should be recorded.
4. Define the scope of transactions synced from Orb, using controls like minimum invoice date or amount.
5. Configure how NetSuite handles transactions synced from Orb – enable to create sales orders and RMAs.
6. **Map items**.
1. A NetSuite Item controls how a line item behaves financially, including which GL account it impacts, how revenue is recognized, and how it’s handled operationally. This mapping determines how Orb line items behave when synced to NetSuite.
2. The integration supports NetSuite items of type = Non-Inventory For Sale.
7. **Map customer metadata.**
1. Any customer-level metadata created before a customer is synced from Orb to NetSuite can be mapped and synced to NetSuite custom entity fields upon creation.
2. This lets you keep key attributes (for example, account owner, billing segment, go‑live date, or internal IDs) aligned between systems without manual re-entry.
3. This is a one-time initial sync upon customer creation in NetSuite.
1. Subsequent updates to this field in Orb are not synced to NetSuite.
2. New customer-level metadata added to the Orb customer record does not update in NetSuite.
8. Review the configuration summary, then save. The review step summarizes the NetSuite setup, accounting settings, chart of accounts, and Orb-to-NetSuite mappings from the previous steps.
Any unmapped item will fail to sync to NetSuite.
# Step 6: (Optional) Manually configure custom records required for credit drawdown.
In order for Orb’s integration to recognize prepaid credit drawdown in NetSuite, the following GL accounts and items must be manually created and configured in NetSuite.
## Custom GL accounts
Setup > Accounting > Chart of Accounts > New.
| **Account Name** | **Account Type** | **Purpose** |
| ------------------------------------------ | ----------------------- | ----------------------------------------------------------------------------------------------------------------------------- |
| Deferred Revenue - Prepaid Credits | Deferred Revenue | Tracks the total prepaid credit balance available for usage, reduced as credits are consumed and cleared when credits expire. |
| Prepayment Clearing - Prepaid Credits | Other Current Liability | Used to enable Customer Deposit application. Always offsets Customer Deposits liability and collapses to zero at expiration. |
| Deferred Revenue - Usage Clearing | Deferred Revenue | Temporary account that serves as an intermediary for journal entries, always netting to zero after each transaction. |
| Revenue - Expired Prepaid Credits | Income | Breakage/expiration revenue. Credited by ARM at month-end close when credit expiration is recognized. |
| Deferred Revenue - Expired Prepaid Credits | Deferred Revenue | Holds the balance of expired prepaid credits for recognition. |
**Validate your Customer Deposits GL account**
Relatedly, while not a custom GL account you need to configure, a Customer Deposits GL account is required for the credit drawdown behavior to function as expected.
To check:
1. Navigate to **Setup → Accounting → Chart of Accounts**
2. Confirm that an account with **Name** = Customer Deposits and **Type** = Other Current Liability exists. If it does, no further action is needed.
To create one, if needed:
1. Navigate to **Transactions → Customers → Record Customer Deposit**
2. Populate the following fields:
* **Customer** — select any active customer, preferably a test customer
* **Payment Amount** — enter a nominal amount (e.g. \$0.01)
* Any additional mandatory fields required by your NetSuite configuration
3. Click **Save**
4. Navigate back to **Setup → Accounting → Chart of Accounts** and confirm the Customer Deposits (Other Current Liability) account now appears.
5. Once confirmed, navigate back to the test Customer Deposit record and delete it. The GL impact will be automatically reversed upon deletion.
## Custom revenue recognition rule
Lists > Accounting > Revenue Recognition Rule > New.
| Rule | Requirements |
| ------------------- | ----------------------------------------------------------------------------------------------------------------------------------------------------------------------------------------------------------------------------------------------------------------------------------------------------------------- |
| Custom Rev Rec Rule |
Here is where to find each value:
| **Input** | **Where to find it** |
| :------------------------- | :---------------------------------------------------------------------------------------------------------------------------- |
| **Client ID** | The Consumer Key saved. |
| **Certificate ID** | The Certificate ID saved. |
| **Private Key** | Base64-encoded contents of `private-key.pem`. |
| **Account ID** | Your NetSuite URL (e.g. `https://1234567.app.netsuite.com` → Account ID is `1234567`). |
| **RESTlet Deployment URL** | This is printed out in the Deployments tab of the script, and looks like `/app/site/hosting/restlet.nl?script=3045&deploy=1`. |
**Sandbox accounts**: If you are connecting a sandbox account, your Account ID may contain an underscore and suffix (e.g. `1234567_SB1`). Provide it exactly as shown in your NetSuite URL or Company Information page.
3. Select and accept all permissions.
## 3. Configure sync behavior and mappings.
1. After establishing a successful connection, define how Orb maps to your NetSuite account.
1. **Subsidiary** → select which entity transactions are created in.
2. **Location** → select a value if this segment is required on a NetSuite transaction. Else, the record will fail to sync.
2. Select the **tax override** **code** configured above, if syncing taxes applied to invoices issued from Orb.
3. Select a **bank account** per currency to determine where payments received in Orb should be recorded.
4. Define the scope of transactions synced from Orb, using controls like minimum invoice date or amount.
5. Configure how NetSuite handles transactions synced from Orb – enable to create sales orders and RMAs.
6. **Map items**.
1. A NetSuite Item controls how a line item behaves financially, including which GL account it impacts, how revenue is recognized, and how it’s handled operationally. This mapping determines how Orb line items behave when synced to NetSuite.
2. The integration supports NetSuite items of type = Non-Inventory For Sale.
7. **Map customer metadata.**
1. Any customer-level metadata created before a customer is synced from Orb to NetSuite can be mapped and synced to NetSuite custom entity fields upon creation.
2. This lets you keep key attributes (for example, account owner, billing segment, go‑live date, or internal IDs) aligned between systems without manual re-entry.
3. This is a one-time initial sync upon customer creation in NetSuite.
1. Subsequent updates to this field in Orb are not synced to NetSuite.
2. New customer-level metadata added to the Orb customer record does not update in NetSuite.
8. Review the configuration summary, then save. The review step summarizes the NetSuite setup, accounting settings, chart of accounts, and Orb-to-NetSuite mappings from the previous steps.
Any unmapped item will fail to sync to NetSuite.
# Step 6: (Optional) Manually configure custom records required for credit drawdown.
In order for Orb’s integration to recognize prepaid credit drawdown in NetSuite, the following GL accounts and items must be manually created and configured in NetSuite.
## Custom GL accounts
Setup > Accounting > Chart of Accounts > New.
| **Account Name** | **Account Type** | **Purpose** |
| ------------------------------------------ | ----------------------- | ----------------------------------------------------------------------------------------------------------------------------- |
| Deferred Revenue - Prepaid Credits | Deferred Revenue | Tracks the total prepaid credit balance available for usage, reduced as credits are consumed and cleared when credits expire. |
| Prepayment Clearing - Prepaid Credits | Other Current Liability | Used to enable Customer Deposit application. Always offsets Customer Deposits liability and collapses to zero at expiration. |
| Deferred Revenue - Usage Clearing | Deferred Revenue | Temporary account that serves as an intermediary for journal entries, always netting to zero after each transaction. |
| Revenue - Expired Prepaid Credits | Income | Breakage/expiration revenue. Credited by ARM at month-end close when credit expiration is recognized. |
| Deferred Revenue - Expired Prepaid Credits | Deferred Revenue | Holds the balance of expired prepaid credits for recognition. |
**Validate your Customer Deposits GL account**
Relatedly, while not a custom GL account you need to configure, a Customer Deposits GL account is required for the credit drawdown behavior to function as expected.
To check:
1. Navigate to **Setup → Accounting → Chart of Accounts**
2. Confirm that an account with **Name** = Customer Deposits and **Type** = Other Current Liability exists. If it does, no further action is needed.
To create one, if needed:
1. Navigate to **Transactions → Customers → Record Customer Deposit**
2. Populate the following fields:
* **Customer** — select any active customer, preferably a test customer
* **Payment Amount** — enter a nominal amount (e.g. \$0.01)
* Any additional mandatory fields required by your NetSuite configuration
3. Click **Save**
4. Navigate back to **Setup → Accounting → Chart of Accounts** and confirm the Customer Deposits (Other Current Liability) account now appears.
5. Once confirmed, navigate back to the test Customer Deposit record and delete it. The GL impact will be automatically reversed upon deletion.
## Custom revenue recognition rule
Lists > Accounting > Revenue Recognition Rule > New.
| Rule | Requirements |
| ------------------- | ----------------------------------------------------------------------------------------------------------------------------------------------------------------------------------------------------------------------------------------------------------------------------------------------------------------- |
| Custom Rev Rec Rule | - Name: Credit Expiration
- Recognition Method: Straight-line, by even periods
- Amount Source: Event-Percent based on amount
- Rec Rec Start Date Source: Event Date
- Rev Rec End Date Source: Event Date
- End Date Change Impact: Update Remaining Periods Only
|
## Custom recognition event type
Lists > Accounting > Custom Recognition Event Types > New.
| Object | Requirements |
| ----------------------------- | ------------------------------------------------------------------------------------------------------- |
| Custom Recognition Event Type | - Name: Prepaid Credit Expiration
- Create Recognition Plan Per Event **checked**
|
## Custom payment method
Setup > Accounting > Accounting Lists > Payment Method > New.
| Object | Requirements |
| --------------------- | --------------------------------------------------------------------------------------------------------------- |
| Custom Payment Method | - Name: Prepaid Credits
- Type = Offline
- Group with Undeposited Funds **checked**
|
## Items
Lists > Accounting > Items > New.
| Item Name | Requirements | |
| ------------------------- | -------------------------------------------------------------------------------------------------------------------------------------------------------------------------------------------------------------- | --------------------------------------------- |
| Prepaid Credit | - Item type: Service for Sale
- Item type: Service for Sale
*Note: you’ll need to configure a credit item per credit currency / credit type. (Ex: USD credits vs. CR credits)* | |
| Prepaid Credit Expiration | - Item type: Service for Sale
| - Item type: Service for Sale
|
| Allocation Expiration | Same as "Prepaid Credit Expiration". | |